

Table of Contents
- Introduction: The Silent Automation Killer
- Understanding State vs. Attributes in Home Automation
- Why Conditional Automations Fail: The Root Cause
- Real-World Scenarios Where This Problem Occurs
- How Triggers Actually Work Behind the Scenes
- Step-by-Step: Diagnosing Your Failing Automation
- Practical Fixes That Actually Work
- Advanced Solutions for Complex Automations
- Common Mistakes That Make Things Worse
- Testing Your Fixed Automations Properly
- Real User Experiences and Lessons Learned
- FAQ
- Final Thoughts
Introduction: The Silent Automation Killer
Let me paint you a picture. It’s 2 AM, your smart thermostat’s humidity attribute just spiked to 85%, and the automation you built to trigger your dehumidifier? It did absolutely nothing. The thermostat’s state still says “heating” it never changed. So your carefully crafted conditional automation sat there, completely blind to the problem.
If you’ve ever stared at your automation logs wondering why nothing fired even though something clearly changed on your device, you’re not alone. I’ve been there myself, and I’ve watched hundreds of users in Home Assistant forums, SmartThings communities, and Node-RED groups hit this exact wall.
The truth is, conditional automations fail when device attributes change but state does not is one of the most misunderstood problems in home automation. And it’s not a bug it’s a fundamental design behavior that most platforms don’t explain well.
In this guide, I’ll break down exactly why this happens, show you real scenarios, and give you battle-tested fixes that actually work. No fluff, no filler just solutions.
Understanding State vs. Attributes in Home Automation
Before we fix anything, we need to understand the core concept that causes this entire problem.
What Is a Device “State”?
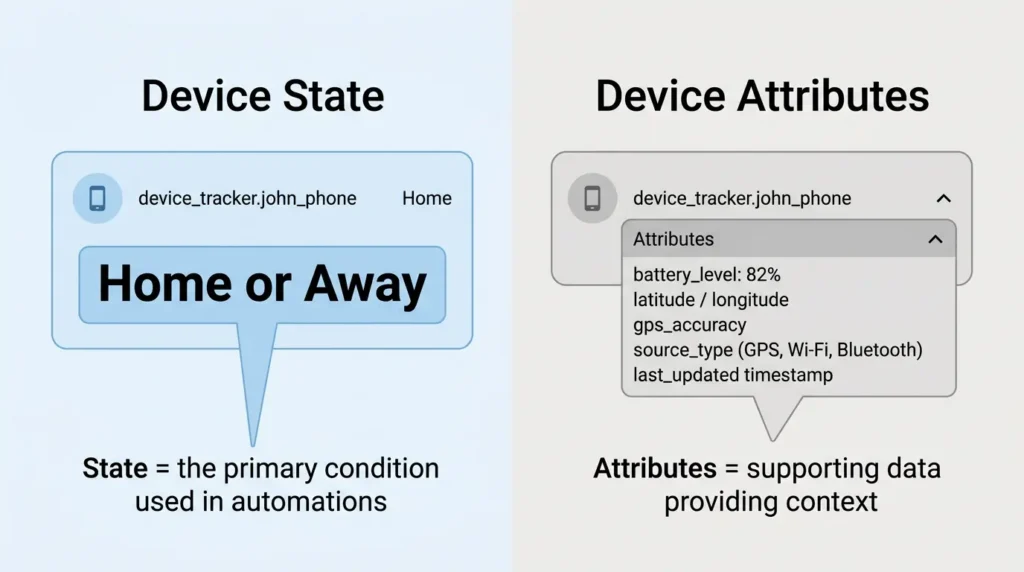
A device’s state is its primary, top-level value. Think of it as the headline answer to “What is this device doing right now?”
Examples:
- A light’s state:
onoroff - A thermostat’s state:
heating,cooling,idle - A motion sensor’s state:
detectedorclear - A media player’s state:
playing,paused,idle
What Are Device “Attributes”?
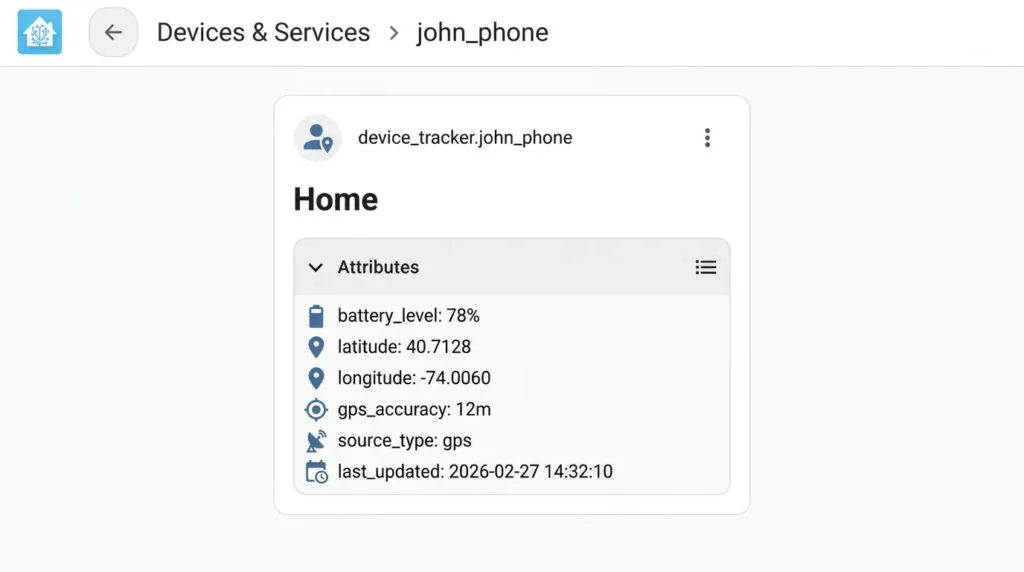
Attributes are the secondary data points attached to that device. They provide context, details, and additional information beyond the main state.
Examples:
- A light’s attributes:
brightness: 75,color_temp: 350,rgb_color: [255, 150, 0] - A thermostat’s attributes:
current_temperature: 72,humidity: 65,target_temperature: 70 - A motion sensor’s attributes:
battery_level: 45,illuminance: 120
The Critical Difference
Here’s where it gets important:
| Aspect | State | Attributes |
|---|---|---|
| Triggers automation by default | ✅ Yes | ❌ No (usually) |
| Changes frequently | Less often | More often |
Monitored by state trigger | ✅ Always | ⚠️ Only if configured |
| Visible in UI | Primary display | Hidden in details |
Most automation platforms including Home Assistant, SmartThings, and others trigger automations based on state changes by default, not attribute changes. This single design decision is the root of nearly every “why didn’t my automation fire?” complaint.
Why Conditional Automations Fail: The Root Cause
Now let’s get to the actual problem.
The Trigger Dependency Problem
Most automation systems follow this logic chain:
textTRIGGER → CONDITION → ACTION
The trigger is the gatekeeper. If the trigger never fires, the condition is never evaluated, and the action never executes. It doesn’t matter how perfect your condition is if the trigger doesn’t activate, nothing happens.
What Happens When Only Attributes Change
Here’s the exact sequence that causes failure:
- Your device’s state remains unchanged (e.g., thermostat stays at
heating) - A device attribute changes (e.g.,
humiditygoes from 60% to 85%) - Your automation has a
statetrigger watching that device - The platform checks: “Did the state change?” → No
- The trigger does NOT fire
- Your condition (which checks the humidity attribute) is never evaluated
- Your action (turn on dehumidifier) never executes
The Fundamental Misconception
Most users assume that automations continuously monitor conditions. They don’t. Conditions are only evaluated at the moment a trigger fires. Think of it this way:
- Trigger = “When should I check?”
- Condition = “Should I proceed?”
- Action = “What should I do?”
If the “when should I check” never happens, the rest is irrelevant.
Real-World Scenarios Where This Problem Occurs
Let me share specific situations where this bites people. These come from real community posts, my own setups, and troubleshooting sessions I’ve helped with.
Scenario 1: The Brightness Automation That Never Worked
Setup: A user wanted to automatically close the blinds when a light’s brightness exceeded 80%, but only when the light was already on.
The automation:
YAMLtrigger:
  - platform: state
    entity_id: light.living_room
condition:
  - condition: numeric_state
    entity_id: light.living_room
    attribute: brightness
    above: 80
action:
  - service: cover.close_cover
    entity_id: cover.living_room_blinds
Why it failed: The light was already on. When brightness changed from 50% to 90%, the state was still on. The trigger never fired because the state never changed. The brightness condition was never checked.
Scenario 2: The Thermostat Humidity Trap
Setup: An automation to turn on an exhaust fan when the thermostat reports humidity above 70%.
Why it failed: The thermostat’s state was cooling and stayed at cooling. Humidity climbed from 55% to 78%, but since the state didn’t change, the trigger never activated.
Scenario 3: The Battery Alert That Came Too Late
Setup: An automation to send a notification when a sensor’s battery drops below 20%.
Why it failed: The motion sensor’s state alternated between detected and clear, but the battery attribute dropped slowly. On the specific day the battery crossed 20%, the sensor happened to not detect any motion for hours so no state change occurred, and no notification was sent.
Scenario 4: Media Player Volume Monitoring
Setup: An automation to automatically lower the volume if it exceeds a certain level after 10 PM.
Why it failed: The media player’s state remained playing while the volume attribute was changed via a remote. No state change no trigger no volume adjustment.
How Triggers Actually Work Behind the Scenes
Understanding the internal mechanics helps you build automations that don’t fail.
The State Object Architecture
In platforms like Home Assistant, every entity has a state object that looks something like this:
JSON{
  "entity_id": "climate.living_room",
  "state": "heating",
  "attributes": {
    "current_temperature": 68,
    "target_temperature": 72,
    "humidity": 65,
    "hvac_modes": ["heat", "cool", "auto", "off"],
    "fan_mode": "auto",
    "friendly_name": "Living Room Thermostat"
  },
  "last_changed": "2025-01-15T10:30:00",
  "last_updated": "2025-01-15T10:35:00"
}
Notice two timestamps:
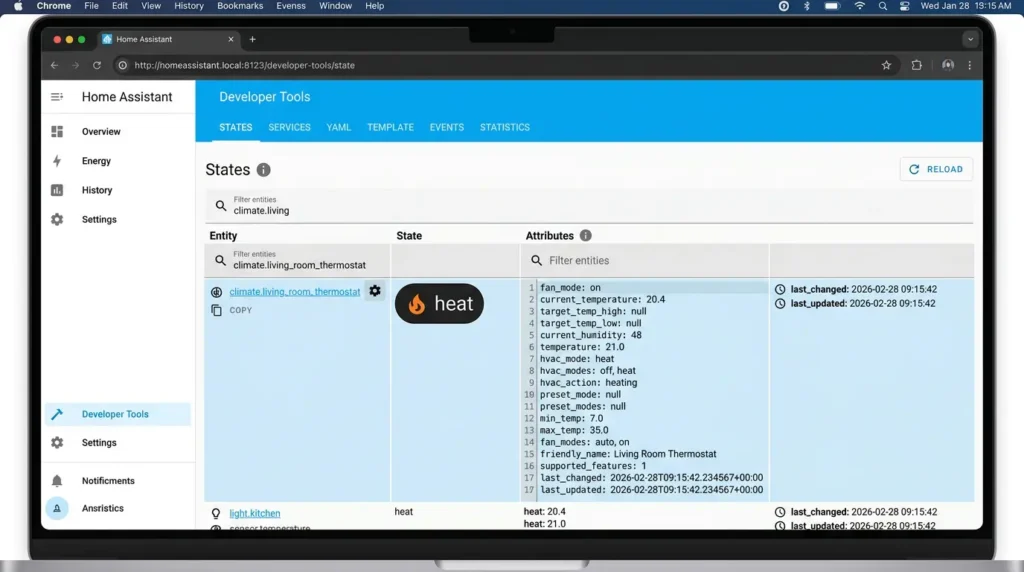
last_changed: Updates only when the state value changeslast_updated: Updates when anything changes (state OR attributes)
How the Default State Trigger Works
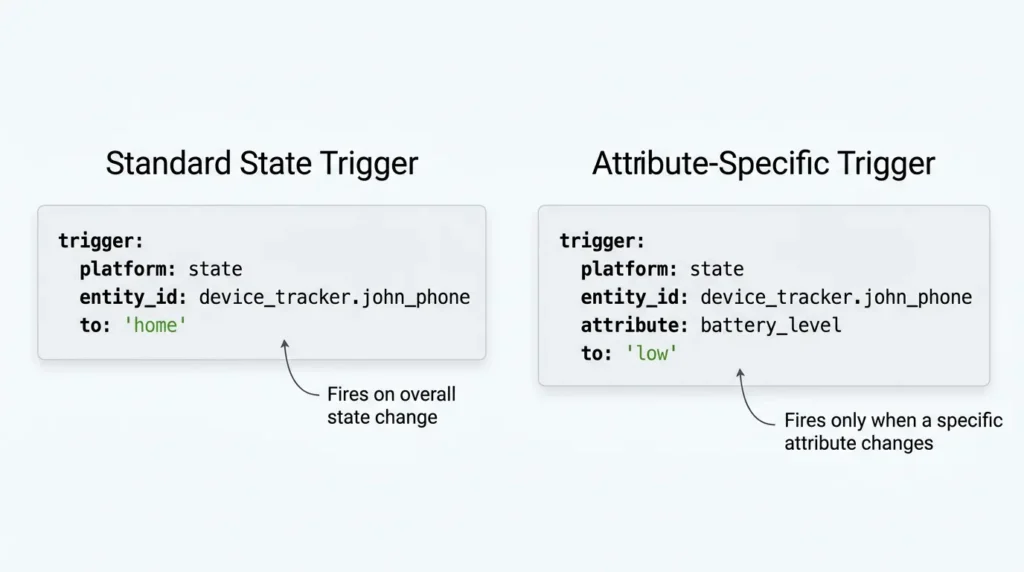
The default state trigger monitors last_changed. If only attributes update, last_changed stays the same, and the trigger ignores the update.
The attribute Parameter: Your Hidden Weapon
Most platforms provide a way to specifically trigger on attribute changes. In Home Assistant, for example:
YAMLtrigger:
  - platform: state
    entity_id: climate.living_room
    attribute: humidity
This tells the system: “I don’t care about the main state. Watch this specific attribute and fire when IT changes.”
This is the single most important thing to understand about this entire problem.
Step-by-Step: Diagnosing Your Failing Automation
If your automation isn’t working, follow these steps to identify whether you’re hitting the state-vs-attribute problem.
Step 1: Check Your Automation’s Trigger Type
Open your automation and look at the trigger configuration. Ask yourself:
- Is it a
statetrigger? - Does it specify an
attributeparameter? - If no attribute is specified, it’s only watching the main state
Step 2: Monitor the Entity’s State History
Go to your entity’s history or logbook. Look for:
- When did the state last change?
- When did the attributes last update?
- Is there a gap between these two?
In Home Assistant, you can check this in Developer Tools → States. Look at the last_changed vs last_updated timestamps.
Step 3: Manually Trace the Automation
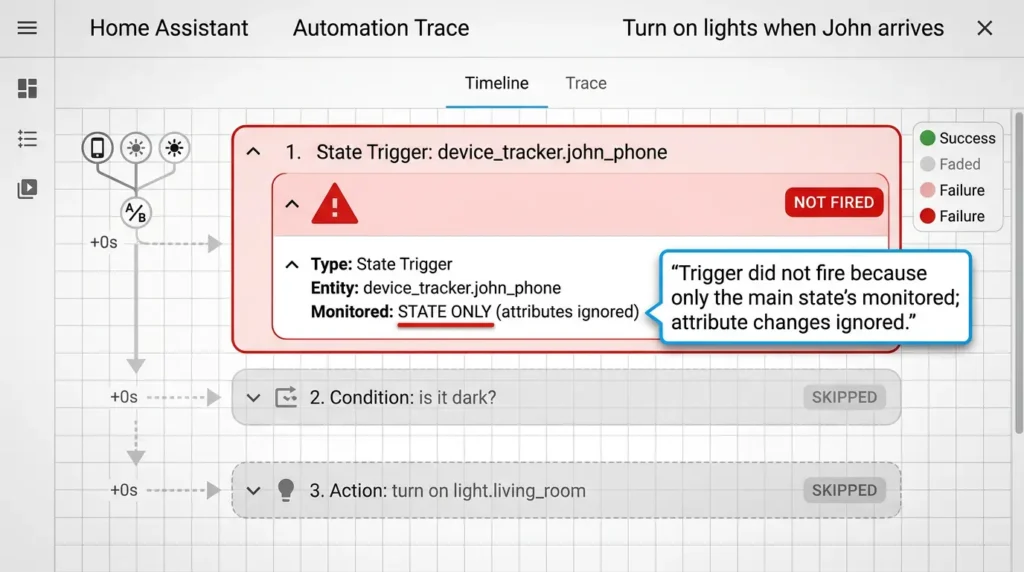
Go to Settings → Automations → [Your Automation] → Traces (in Home Assistant) or your platform’s equivalent. If there are no trace entries around the time the attribute changed, the trigger never fired.
Step 4: Test with a Forced State Change
Temporarily force a state change on the device and see if the automation fires then. If it does, you’ve confirmed the problem: your trigger only responds to state changes, not attribute changes.
Step 5: Check the Developer Console
Use your browser’s developer console or your platform’s API to inspect the entity in real-time. Watch the state object update and note what changes and what doesn’t.
Practical Fixes That Actually Work
Here are the proven solutions, ranked from simplest to most robust.
Fix 1: Use Attribute-Specific Triggers
The simplest and most direct fix. Instead of triggering on state changes, trigger on the specific attribute you care about.
Before (broken):
YAMLautomation:
  trigger:
    - platform: state
      entity_id: climate.thermostat
  condition:
    - condition: numeric_state
      entity_id: climate.thermostat
      attribute: humidity
      above: 70
  action:
    - service: switch.turn_on
      entity_id: switch.dehumidifier
After (working):
YAMLautomation:
  trigger:
    - platform: numeric_state
      entity_id: climate.thermostat
      attribute: humidity
      above: 70
  action:
    - service: switch.turn_on
      entity_id: switch.dehumidifier
Notice: I moved the condition logic into the trigger itself using numeric_state with the attribute parameter. Now the automation fires the moment humidity crosses 70%, regardless of the thermostat’s main state.
Fix 2: Use Template Triggers
For more complex scenarios where you need to monitor multiple attributes or combine attribute checks with other conditions:
YAMLautomation:
  trigger:
    - platform: template
      value_template: >
        {{ state_attr('climate.thermostat', 'humidity') | float > 70
           and is_state('climate.thermostat', 'heating') }}
  action:
    - service: switch.turn_on
      entity_id: switch.dehumidifier
Template triggers evaluate whenever any referenced entity updates (including attribute updates), making them much more responsive.
Fix 3: Use Time-Based Polling as a Safety Net
Sometimes you want a backup mechanism that checks periodically, just in case:
YAMLautomation:
  trigger:
    - platform: numeric_state
      entity_id: climate.thermostat
      attribute: humidity
      above: 70
    - platform: time_pattern
      minutes: "/5"
  condition:
    - condition: numeric_state
      entity_id: climate.thermostat
      attribute: humidity
      above: 70
  action:
    - service: switch.turn_on
      entity_id: switch.dehumidifier
This automation will fire when humidity crosses 70% AND checks every 5 minutes as a fallback. The condition ensures the action only executes when humidity is actually above 70%.
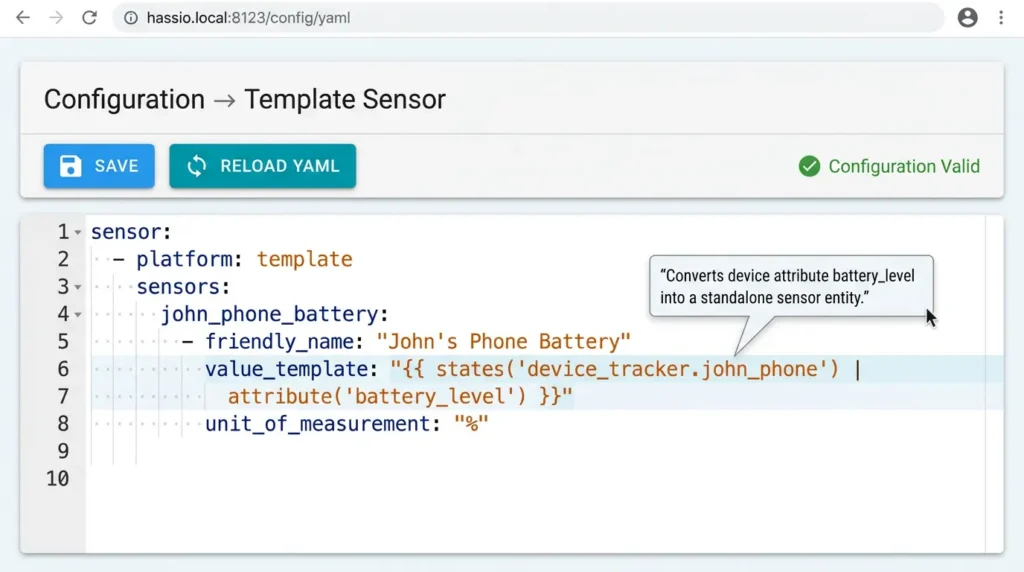
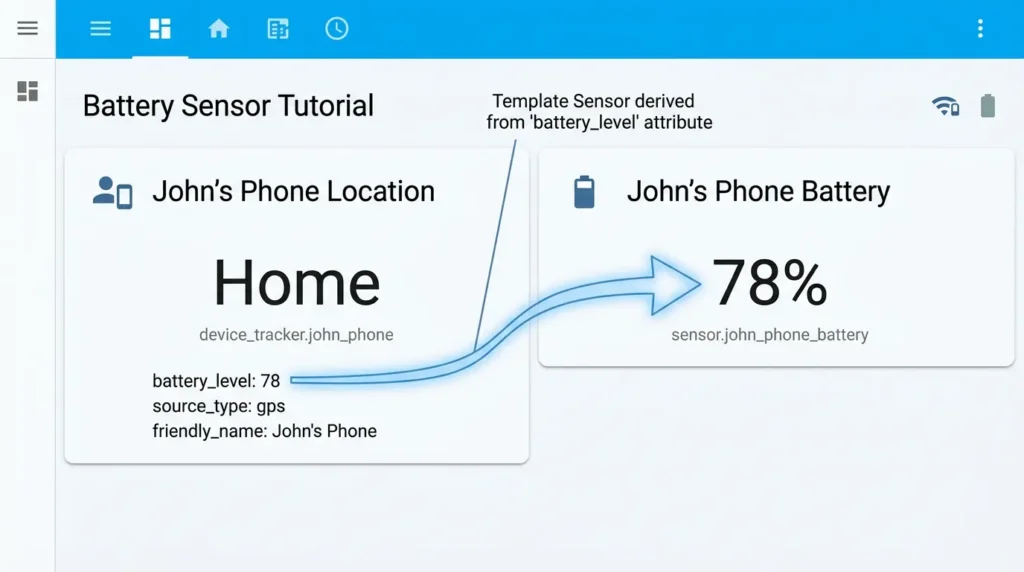
Fix 4: Create a Template Sensor
Convert the attribute into its own entity with a dedicated state:
YAMLtemplate:
  - sensor:
      - name: "Thermostat Humidity"
        unit_of_measurement: "%"
        state: "{{ state_attr('climate.thermostat', 'humidity') }}"
Now sensor.thermostat_humidity has its own state that changes whenever humidity changes. You can use a normal state trigger on this new sensor:
YAMLautomation:
  trigger:
    - platform: numeric_state
      entity_id: sensor.thermostat_humidity
      above: 70
  action:
    - service: switch.turn_on
      entity_id: switch.dehumidifier
This is my personal favorite approach because it makes the attribute visible, trackable in history, and easy to use in multiple automations.
Advanced Solutions for Complex Automations
Using to and from Parameters with Attributes
You can get very specific about which attribute changes matter:
YAMLtrigger:
  - platform: state
    entity_id: light.living_room
    attribute: brightness
    from: 50
    to: 100
Combining Multiple Attribute Triggers
YAMLtrigger:
  - platform: numeric_state
    entity_id: climate.thermostat
    attribute: humidity
    above: 70
    id: "humidity_high"
  - platform: numeric_state
    entity_id: climate.thermostat
    attribute: current_temperature
    above: 80
    id: "temp_high"
action:
  - choose:
      - conditions:
          - condition: trigger
            id: "humidity_high"
        sequence:
          - service: switch.turn_on
            entity_id: switch.dehumidifier
      - conditions:
          - condition: trigger
            id: "temp_high"
        sequence:
          - service: climate.set_hvac_mode
            entity_id: climate.thermostat
            data:
              hvac_mode: cool
Using Node-RED for Attribute-Based Automations
If you’re using Node-RED with Home Assistant, the events: state node has a dedicated option to trigger on attribute changes:
- Add an events: state node
- Set the entity
- Under Output on Connect, select the attribute
- Check “State change” and ensure “Ignore attribute changes” is unchecked
AppDaemon Approach
For Python enthusiasts using AppDaemon:
Pythondef initialize(self):
    self.listen_state(
        self.humidity_changed,
        "climate.thermostat",
        attribute="humidity"
    )

def humidity_changed(self, entity, attribute, old, new, kwargs):
    if float(new) > 70:
        self.turn_on("switch.dehumidifier")
Common Mistakes That Make Things Worse
Mistake 1: Using for Duration with Attribute Triggers Incorrectly
YAML# This can be unreliable:
trigger:
  - platform: numeric_state
    entity_id: climate.thermostat
    attribute: humidity
    above: 70
    for: "00:10:00"
The for parameter requires the condition to remain true for the entire duration. If the humidity fluctuates (70 → 71 → 69 → 72), the timer resets every time it drops below 70.
Mistake 2: Watching All Attributes Unintentionally
YAML# This triggers on ANY attribute change - too noisy:
trigger:
  - platform: state
    entity_id: climate.thermostat
    attribute: all  # DON'T do this
Mistake 3: Not Accounting for unknown and unavailable States
When a device goes offline, its state becomes unavailable. This IS a state change and WILL fire your state trigger. Always add guards:
YAMLcondition:
  - condition: not
    conditions:
      - condition: state
        entity_id: climate.thermostat
        state: "unavailable"
      - condition: state
        entity_id: climate.thermostat
        state: "unknown"
Mistake 4: Assuming Attributes Update in Real-Time
Some devices only report attribute changes at intervals (every 30 seconds, every 5 minutes, etc.). Your automation can only react as fast as the device reports. Check your device’s reporting interval in its integration documentation.
Mistake 5: Duplicate Automations Conflicting
If you create multiple automations watching the same attribute, they can interfere with each other one turning a device on while another turns it off in rapid succession.
Testing Your Fixed Automations Properly
Method 1: Use Developer Tools to Force Attribute Changes
In Home Assistant:
- Go to Developer Tools → Services
- Call a service that changes the attribute (e.g.,
light.turn_onwith a specific brightness) - Watch if your automation triggers
Method 2: Check Automation Traces
After making changes:
- Go to Settings → Automations
- Click on your automation
- Click Traces
- Look for new trace entries showing the trigger fired
Method 3: Add Temporary Notifications
Add a temporary notification action to confirm the automation is firing:
YAMLaction:
  - service: notify.mobile_app
    data:
      message: "Automation fired! Humidity: {{ state_attr('climate.thermostat', 'humidity') }}"
  # Your actual actions below...
  - service: switch.turn_on
    entity_id: switch.dehumidifier
Method 4: Enable Debug Logging
Add to your configuration.yaml:
YAMLlogger:
  default: warning
  logs:
    homeassistant.components.automation: debug
This gives you detailed logs about trigger evaluation, condition checks, and action execution.
Real User Experiences and Lessons Learned
Experience 1: The Smart Lock Battery Disaster
“My front door smart lock battery died completely because my low-battery automation never triggered. The lock’s state was always ‘locked’ or ‘unlocked’ the battery percentage was just an attribute. I only found out when I couldn’t unlock my door after work. Now I use a template sensor for every battery attribute and trigger on that.” User on Home Assistant Community Forum
Experience 2: The Washing Machine Notification
“I spent weeks trying to figure out why my ‘washing machine done’ automation wasn’t working. The smart plug’s state showed ‘on’ the entire cycle. The power consumption attribute dropped from 500W to 2W when the cycle ended, but my state trigger never caught it. Switching to a numeric_state trigger with the power attribute fixed it immediately.” Reddit r/homeassistant user
Experience 3: The Color Temperature Fail
“I wanted my lights to automatically shift to warm white after sunset based on their color_temp attribute. The lights were already on (state: ‘on’), so changing color_temp via a scene never triggered my automation. Creating a template sensor for the color temperature and triggering on that was the solution.” SmartThings community member
My Personal Experience
I once built an automation to alert me when my server room temperature exceeded 85°F. The temperature was reported as an attribute of a multi-sensor whose primary state was the motion detection status. During a weekend when no one was in the server room (no motion detected = no state change), the temperature climbed to 94°F before I happened to check manually.
After that incident, I adopted a two-layer approach: attribute-specific triggers for real-time response AND time-pattern triggers every 10 minutes as a safety net. It has never failed since.
Frequently Asked Questions (FAQ)
Q1: Does this problem affect all home automation platforms?
Yes, to varying degrees. Home Assistant, SmartThings, Hubitat, and most platforms differentiate between state and attributes. The specific behavior and available workarounds vary by platform, but the core issue triggers defaulting to state-only monitoring is nearly universal.
Q2: Will using template sensors slow down my system?
No, not noticeably. Template sensors are lightweight. Even with dozens of them, the performance impact is negligible on modern hardware. I run over 40 template sensors on a Raspberry Pi 4 with zero performance issues.
Q3: Can I trigger on multiple attributes of the same device simultaneously?
Yes. You can create multiple triggers within a single automation, each watching a different attribute. Use trigger IDs to differentiate which attribute caused the automation to fire.
Q4: Why doesn’t Home Assistant just trigger on all changes by default?
Performance and noise. Some entities update attributes dozens of times per minute (energy monitors, weather stations). If every attribute change triggered every automation watching that entity, the system would be overwhelmed with unnecessary evaluations.
Q5: Is there a way to see all attribute changes in real-time?
Yes. In Home Assistant, go to Developer Tools → Events and listen for state_changed events. These events include both old and new states AND attributes, showing you exactly what changed.
Q6: Do conditions also check attributes, or only states?
Conditions CAN check attributes if you specify them. The numeric_state condition supports an attribute parameter, and template conditions can access any attribute via state_attr().
Q7: What about MQTT devices do they have the same problem?
Yes. MQTT entities in Home Assistant follow the same state/attribute model. If your MQTT device publishes attribute data to a JSON payload, you’ll need attribute-specific triggers just like any other entity.
Q8: Can I retroactively see when attributes changed in history?
By default, no. Home Assistant’s history recorder tracks state changes but may not display detailed attribute history. Creating a template sensor ensures the attribute value is tracked as a proper state with full history.
Final Thoughts
The state-vs-attribute distinction is one of those things that seems like an annoying technicality until your humidity automation fails to protect your home from mold, or your battery alert doesn’t fire before a critical sensor dies.
Here’s what I want you to take away from this article:
- State triggers only fire on state changes attributes are invisible to them by default
- Always use attribute-specific triggers when the data you care about is an attribute
- Template sensors are your best friend they convert hidden attributes into visible, trackable, trigger-able entities
- Add time-based safety nets for critical automations don’t rely on a single trigger mechanism
- Test your automations by forcing attribute changes and checking traces
This isn’t a bug to be frustrated about. It’s a design pattern to understand and work with. Once you internalize the trigger → condition → action pipeline and the role attributes play in it, you’ll build automations that are reliable, predictable, and genuinely smart.
Your smart home should actually be smart. Now you have the knowledge to make it so.