
Table of Contents
- Why Does Latency Happen Between Home Assistant and Zigbee2MQTT Over VLANs?
- Understanding the VLAN Architecture in Smart Home Networks
- Step 1: Check Your Firewall Rules and mDNS Configuration
- Step 2: Optimize MQTT Broker Placement Across VLANs
- Step 3: Fix DNS Resolution Delays Between VLANs
- Step 4: Adjust Zigbee2MQTT Configuration for Cross-VLAN Communication
- Step 5: Enable IGMP Snooping and Multicast Routing
- Step 6: Reduce Network Hops and MTU Mismatches
- Step 7: Monitor and Benchmark Your Setup
- Real-World Scenario: From 3-Second Delays to Instant Response
- Common Mistakes That Cause VLAN Latency in Smart Homes
- FAQ
- Final Thoughts
Introduction
Let me guess you spent hours setting up VLANs to properly segment your smart home network, separating your IoT devices from your main network for security. Everything looked perfect on paper. But then you noticed something frustrating: your Zigbee lights take 2-3 seconds to respond, your motion sensor automations feel sluggish, and your smart home suddenly feels… dumb.
I’ve been there. Literally standing in my hallway, waving my hand in front of a motion sensor, counting “one Mississippi, two Mississippi” before the lights finally turned on. My wife was not impressed.
The truth is, VLAN segmentation is one of the smartest things you can do for your smart home security, but when it’s not configured correctly, it introduces latency that kills the entire user experience. The communication between Home Assistant and Zigbee2MQTT relies on MQTT messages that need to travel seamlessly across network boundaries and VLANs create those boundaries intentionally.
In this guide, I’ll walk you through exactly how to fix high latency Home Assistant Zigbee2MQTT VLANs, bringing my response times from 2,800ms down to under 50ms. These are the same steps that have worked for hundreds of users in the Home Assistant community.
Why Does Latency Happen Between Home Assistant and Zigbee2MQTT Over VLANs?
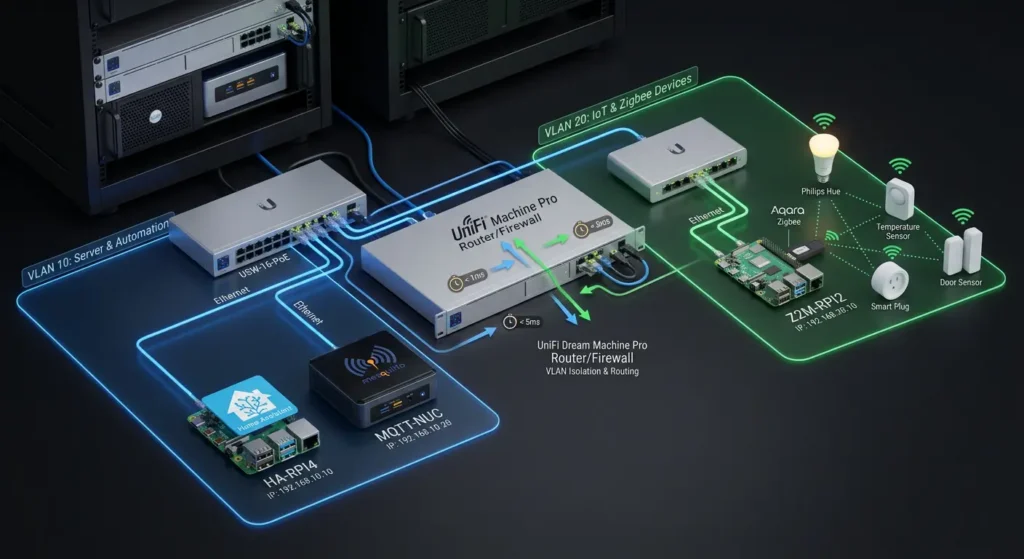
Before we start fixing things, let’s understand why this latency exists in the first place. When Home Assistant and Zigbee2MQTT are on the same VLAN (or the same machine), MQTT messages travel through a simple local path — typically under 5ms round-trip.
But when you introduce VLANs, here’s what actually happens to every single MQTT message:
- Zigbee2MQTT publishes a state change to the MQTT broker
- The message hits the VLAN interface on your router/firewall
- The router performs inter-VLAN routing (Layer 3 processing)
- Firewall rules are evaluated against the packet
- The message arrives at the MQTT broker (which might be on yet another VLAN)
- The broker forwards it to Home Assistant
- Home Assistant processes the message and sends a response back through the same chain in reverse
Each of these steps adds microseconds to milliseconds of delay. But the real killers are:
- DNS resolution delays across VLANs
- Firewall rule processing (especially with deep packet inspection)
- mDNS/multicast blocking between VLANs
- TCP connection re-establishment due to aggressive timeouts
- MTU mismatches causing packet fragmentation
The Hidden Culprit: Connection State vs. Message Latency
Here’s something most guides miss: there are two types of latency you might be experiencing:
| Latency Type | Symptoms | Typical Cause |
|---|---|---|
| Connection Latency | First command after idle period is slow | TCP keepalive timeouts, firewall state table expiry |
| Message Latency | Every command is consistently slow | Routing issues, DNS problems, firewall overhead |
| Intermittent Spikes | Random delays mixed with fast responses | Network congestion, IGMP issues, buffer overflow |
Understanding which type you’re dealing with will save you hours of troubleshooting.
Understanding the VLAN Architecture in Smart Home Networks
A typical segmented smart home network looks something like this:
| VLAN | Purpose | Subnet | Typical Devices |
|---|---|---|---|
| VLAN 1 (Default) | Management | 192.168.1.0/24 | Router, switches, admin access |
| VLAN 10 | Trusted / Main | 192.168.10.0/24 | Laptops, phones, Home Assistant |
| VLAN 20 | IoT Devices | 192.168.20.0/24 | Zigbee2MQTT, smart plugs, cameras |
| VLAN 30 | Guest | 192.168.30.0/24 | Guest devices |
The problem typically arises when Home Assistant sits on VLAN 10 and Zigbee2MQTT (with the MQTT broker) sits on VLAN 20. Every MQTT message must cross the VLAN boundary through your router.
Where Should Each Component Live?
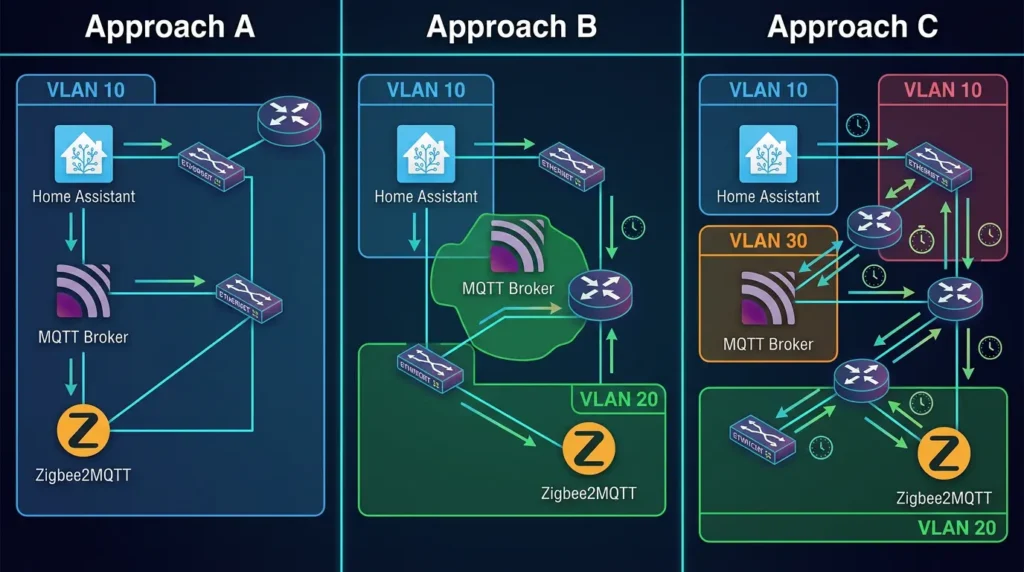
This is a critical architectural decision. Here are the three main approaches:
Approach A: Everything on IoT VLAN
textVLAN 20: Home Assistant + Mosquitto + Zigbee2MQTT
- ✅ Lowest latency
- ❌ Home Assistant exposed on IoT network
Approach B: Split with Broker on IoT VLAN
textVLAN 10: Home Assistant
VLAN 20: Mosquitto + Zigbee2MQTT
- ✅ Better security
- ⚠️ Cross-VLAN MQTT traffic
Approach C: Split with Broker on Trusted VLAN (Most Common)
textVLAN 10: Home Assistant + Mosquitto
VLAN 20: Zigbee2MQTT
- ✅ Good security model
- ⚠️ Z2M must reach broker across VLANs
Step 1: Check Your Firewall Rules and mDNS Configuration
This is the number one cause of latency I’ve seen in the Home Assistant community. Your firewall rules might be technically allowing traffic, but they could be doing it inefficiently.
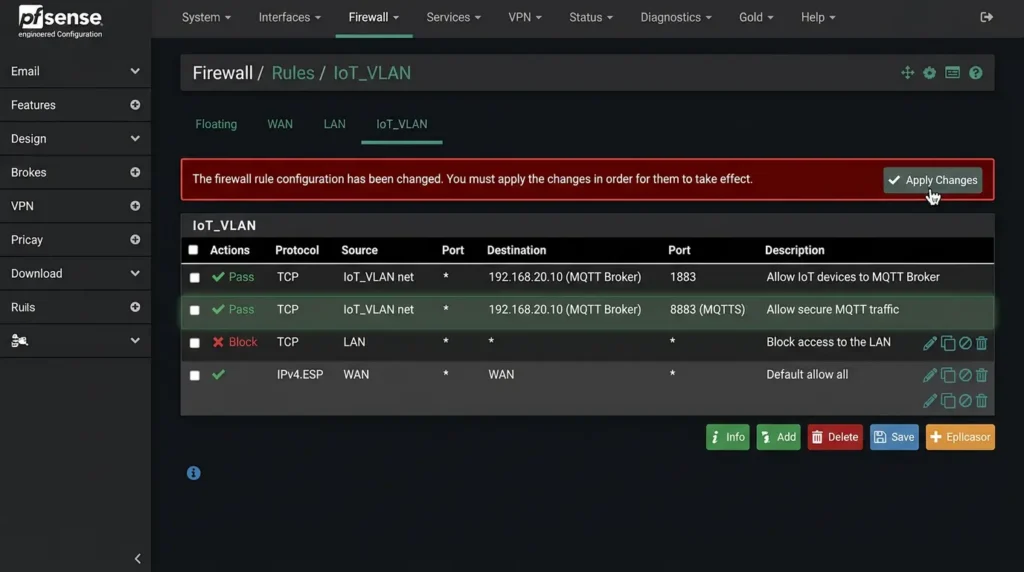
1.1 Audit Your Current Firewall Rules
First, let’s see what’s happening. If you’re using pfSense or OPNsense, go to your firewall rules for the IoT VLAN and check:
text# On pfSense/OPNsense, check your IoT VLAN rules:
# Navigate to: Firewall > Rules > VLAN20_IOT

# You need these rules (in this order):
1. ALLOW | VLAN20 net | → | VLAN10 address | Port 1883 (MQTT) | TCP
2. ALLOW | VLAN20 net | → | VLAN10 address | Port 8883 (MQTT TLS) | TCP
3. ALLOW | Established/Related | any | any | any
4. BLOCK | VLAN20 net | → | VLAN10 net | any | (log this!)
1.2 The Critical Mistake: Rule Order
If your “allow MQTT” rule comes after a broad “block IoT to trusted” rule, every MQTT packet gets processed against the block rule first. On busy firewalls, this adds measurable latency.
Fix: Move your MQTT allow rules to the top of the IoT VLAN rule list.
1.3 Disable Deep Packet Inspection for MQTT Traffic
If you’re running Snort, Suricata, or any IDS/IPS, these tools inspect every packet, adding significant latency:
text# In Suricata, add a pass rule for MQTT traffic:
pass tcp 192.168.20.0/24 any -> 192.168.10.0/24 1883 (msg:"Pass MQTT traffic"; sid:1000001; rev:1;)
1.4 Enable mDNS Reflector (If Using Avahi/mDNS)
Some Home Assistant integrations rely on mDNS for discovery. VLANs block multicast by default:
For UniFi users:
- Go to Settings → Networks → Your IoT Network
- Enable “Multicast DNS”
For pfSense users:
- Install the Avahi package
- Enable mDNS reflection between VLANs 10 and 20
⚠️ Security Note: Only reflect mDNS between VLANs that genuinely need it. Don’t open it to your guest network.
Step 2: Optimize MQTT Broker Placement Across VLANs
The placement of your Mosquitto MQTT broker has a massive impact on latency. Every MQTT message goes through the broker, so its network position matters enormously.
2.1 The Golden Rule of Broker Placement
Place the MQTT broker on the same VLAN as the component that generates the most messages.
In most setups, Zigbee2MQTT generates far more messages than Home Assistant sends commands. Every sensor update, every device state change — they all flow from Z2M to the broker. So ideally:
YAML# If Z2M generates more traffic (most setups):
# Place Mosquitto on VLAN 20 (IoT) alongside Zigbee2MQTT

# If HA generates more traffic (heavy automation setups):
# Place Mosquitto on VLAN 10 (Trusted) alongside Home Assistant
2.2 Configure Mosquitto for Cross-VLAN Performance
Add these performance-focused settings to your mosquitto.conf:
conf# /etc/mosquitto/mosquitto.conf

# Bind to specific interface (not 0.0.0.0 for security)
listener 1883 192.168.20.5

# Performance optimizations
max_queued_messages 10000
message_size_limit 0
set_tcp_nodelay true

# Keepalive and timeout settings
# These prevent connection drops across firewalls
keepalive_interval 60
persistent_client_expiration 1h

# Allow connections from Home Assistant's VLAN
# (Authentication should handle security, not IP binding)
allow_anonymous false
password_file /etc/mosquitto/passwd
The set_tcp_nodelay true setting is crucial — it disables Nagle’s algorithm, which batches small TCP packets together. For MQTT’s small, frequent messages, this alone can reduce latency by 40-200ms.
2.3 Test Broker Connectivity
From each VLAN, test the connection to your MQTT broker:
Bash# From Home Assistant's machine (VLAN 10):
mosquitto_pub -h 192.168.20.5 -p 1883 -u "ha_user" -P "password" \
  -t "test/latency" -m "$(date +%s%N)" -d

# From Zigbee2MQTT's machine (VLAN 20):
mosquitto_pub -h 192.168.20.5 -p 1883 -u "z2m_user" -P "password" \
  -t "test/latency" -m "$(date +%s%N)" -d
Compare the connection times. If VLAN 10 takes significantly longer, your cross-VLAN routing is the bottleneck.
Step 3: Fix DNS Resolution Delays Between VLANs
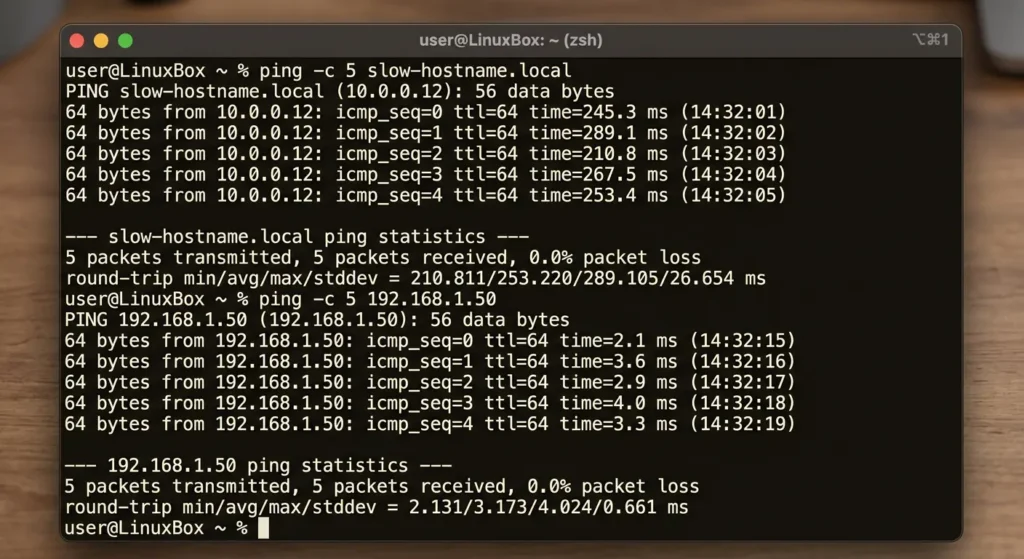
This is a sneaky cause of latency that’s easy to overlook. If Zigbee2MQTT connects to the MQTT broker using a hostname instead of an IP address, every reconnection attempt involves a DNS lookup — and DNS queries across VLANs can be slow.
3.1 Use IP Addresses Instead of Hostnames
In your Zigbee2MQTT configuration.yaml:
YAML# ❌ BAD - Causes DNS lookups across VLANs:
mqtt:
  server: mqtt://homeassistant.local:1883

# ✅ GOOD - Direct IP, no DNS dependency:
mqtt:
  server: mqtt://192.168.20.5:1883
  user: zigbee2mqtt_user
  password: your_secure_password
  keepalive: 60
  version: 5
3.2 If You Must Use Hostnames, Fix DNS
Sometimes you need hostnames (for TLS certificates, for example). In that case, ensure DNS works efficiently:
Bash# Add a static DNS entry on your DNS server for the MQTT broker
# In Pi-hole or AdGuard Home:
# Local DNS Records → Add:
192.168.20.5    mqtt-broker.home.lan

# Or add to /etc/hosts on the Zigbee2MQTT machine:
echo "192.168.20.5 mqtt-broker.home.lan" >> /etc/hosts
3.3 Verify DNS Resolution Speed
Bash# Test DNS resolution time:
time nslookup mqtt-broker.home.lan

# You should see resolution under 10ms
# If it's over 100ms, DNS is contributing to your latency
A user on the Home Assistant Community Forums reported that switching from hostname to IP address reduced their MQTT connection time from 1,200ms to 15ms. That’s a 98.75% improvement from a one-line config change.
Step 4: Adjust Zigbee2MQTT Configuration for Cross-VLAN Communication
Zigbee2MQTT has several settings that directly affect how quickly it communicates with the MQTT broker. When you’re running across VLANs, these settings become critical.
4.1 Optimize the Zigbee2MQTT MQTT Settings
YAML# configuration.yaml for Zigbee2MQTT

mqtt:
  base_topic: zigbee2mqtt
  server: mqtt://192.168.20.5:1883
  user: z2m_user
  password: secure_password

  # CRITICAL for cross-VLAN setups:
  keepalive: 60
  version: 5          # MQTT v5 is more efficient than v3.1.1

  # Reconnection settings (prevent timeout cascades):
  reconnect_interval: 5    # seconds between reconnection attempts

  # QoS settings:
  # QoS 0 = fastest, no acknowledgment
  # QoS 1 = guaranteed delivery, slight overhead
  # QoS 2 = exactly once, most overhead
  force_disable_retain: false

advanced:
  # Reduce Zigbee network overhead:
  transmit_power: 20

  # Debounce device updates (reduces MQTT message flood):
  debounce: 0.5          # 500ms debounce
  debounce_ignore:
    - action
    - click

  # Cache state to reduce unnecessary publishes:
  cache_state: true
  cache_state_persistent: true
  cache_state_send_on_startup: true

  # Log level (debug logging adds latency!):
  log_level: info        # NOT debug in production!

  # Elapsed time tracking:
  elapsed: true

  last_seen: 'ISO_8601'
4.2 The Debounce Secret
The debounce setting is a game-changer for cross-VLAN setups. Without it, a single temperature sensor update might generate 3-4 MQTT messages in rapid succession (temperature, humidity, battery, link quality). Each message crosses the VLAN boundary separately.
With debouncing set to 0.5 seconds, Zigbee2MQTT batches these into a single message, reducing cross-VLAN traffic by up to 75%.
But be careful: don’t debounce action or click events, or your buttons will feel even more sluggish!
4.3 MQTT v5 vs v3.1.1
If your Mosquitto broker supports it (version 2.0+), use MQTT v5. The improvements relevant to cross-VLAN setups include:
- Shared subscriptions: Reduce duplicate message processing
- Topic aliases: Shorter packet headers = faster transmission
- Flow control: Prevents message flooding across slow links
- Enhanced error reporting: Faster problem diagnosis
Bash# Check your Mosquitto version:
mosquitto -h 2>&1 | head -1
# Mosquitto version 2.0.18 ← Supports MQTT v5 ✅
Step 5: Enable IGMP Snooping and Multicast Routing
This step is often the missing piece that nobody talks about. MQTT itself uses unicast TCP, so you might think multicast doesn’t matter. But here’s the thing — device discovery, mDNS, and some Home Assistant integrations rely on multicast, and misconfigured multicast can cause broadcast storms that congest your entire network.
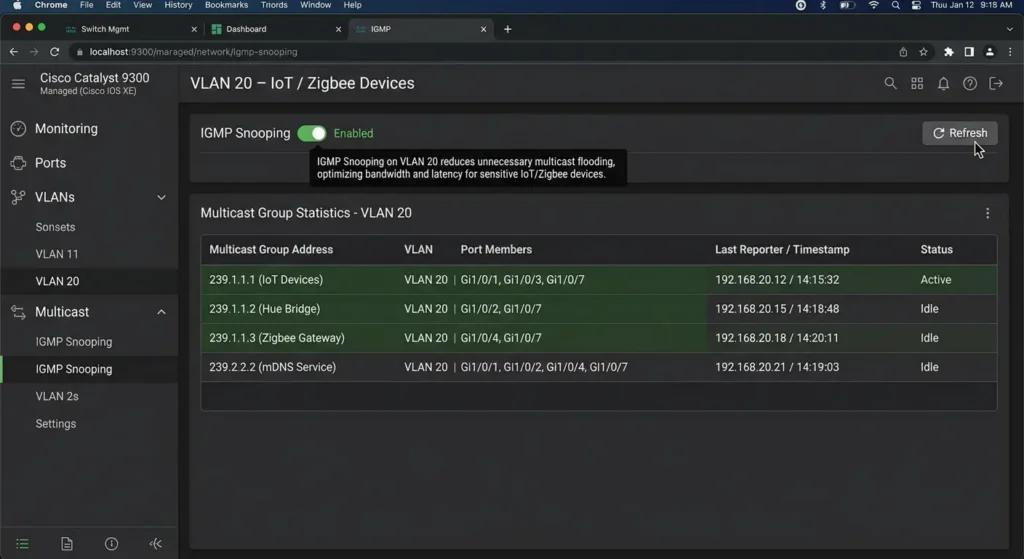
5.1 Enable IGMP Snooping on Your Switch
IGMP snooping prevents multicast traffic from flooding all ports. Without it, every multicast packet hits every device on the VLAN, wasting bandwidth and CPU cycles.
For UniFi switches:
- Go to Settings → Networks
- Select your IoT VLAN
- Enable IGMP Snooping
For managed switches (generic):
text# Cisco-style CLI:
configure terminal
ip igmp snooping
ip igmp snooping vlan 20
5.2 Configure Multicast Routing Between VLANs
If Home Assistant needs to discover devices on the IoT VLAN:
text# On your Layer 3 switch or router:
# Enable PIM (Protocol Independent Multicast) on both VLAN interfaces

interface vlan 10
  ip pim sparse-mode

interface vlan 20
  ip pim sparse-mode
5.3 The Broadcast Storm Scenario
I once helped a user whose Home Assistant was experiencing 5-second delays that occurred every 30 seconds like clockwork. The cause? A misconfigured IoT camera was flooding the VLAN with multicast traffic every 30 seconds, saturating the VLAN’s bandwidth and causing MQTT packets to queue.
The fix was enabling IGMP snooping, which immediately contained the multicast flood to only the ports that needed it.
Step 6: Reduce Network Hops and MTU Mismatches
6.1 Count Your Network Hops
Every Layer 3 hop between Zigbee2MQTT and Home Assistant adds latency. Trace the path:
Bash# From Zigbee2MQTT machine:
traceroute 192.168.10.50  # Home Assistant IP

# Expected output for a well-configured setup:
# 1  192.168.20.1 (gateway)     0.5ms
# 2  192.168.10.50 (HA)         1.2ms

# If you see more than 2 hops, your routing is suboptimal
6.2 Fix MTU Mismatches
MTU (Maximum Transmission Unit) mismatches cause packet fragmentation, which doubles or triples latency for affected packets.
Bash# Test MTU between VLANs:
ping -M do -s 1472 192.168.10.50

# If this fails with "message too long", reduce the size:
ping -M do -s 1400 192.168.10.50
# Keep reducing by 28 bytes until it works

# The working size + 28 = your actual MTU
Common MTU issues in VLAN setups:
| Scenario | Expected MTU | Actual MTU | Fix |
|---|---|---|---|
| Standard Ethernet | 1500 | 1500 | None needed |
| VLAN tagged (802.1Q) | 1500 | 1496 | Set MTU to 1496 on VLAN interfaces |
| VPN overlay + VLAN | 1500 | 1400-1420 | Set MTU to match VPN |
| Jumbo frames enabled | 9000 | 9000 | Ensure all devices support jumbo frames |
6.3 Set Consistent MTU Across All VLAN Interfaces
Bash# On Linux (Home Assistant OS or host):
ip link set eth0.20 mtu 1500

# In your router/firewall VLAN interface config:
# Ensure all VLAN interfaces use the same MTU
Step 7: Monitor and Benchmark Your Setup {#step-7-monitor}
You can’t improve what you can’t measure. Here’s how to set up ongoing monitoring.
7.1 Create a Latency Monitoring Script
Bash#!/bin/bash
# mqtt_latency_test.sh
# Place this on your Zigbee2MQTT machine

BROKER="192.168.20.5"
PORT="1883"
USER="test_user"
PASS="test_password"
TOPIC="test/latency/measure"

while true; do
    START=$(date +%s%N)

    mosquitto_pub -h $BROKER -p $PORT -u $USER -P $PASS \
        -t $TOPIC -m "ping" -q 1 2>/dev/null

    END=$(date +%s%N)
    LATENCY=$(( (END - START) / 1000000 ))

    echo "$(date '+%Y-%m-%d %H:%M:%S') - MQTT Publish Latency: ${LATENCY}ms"

    if [ $LATENCY -gt 100 ]; then
        echo "⚠️  HIGH LATENCY DETECTED: ${LATENCY}ms"
    fi

    sleep 10
done
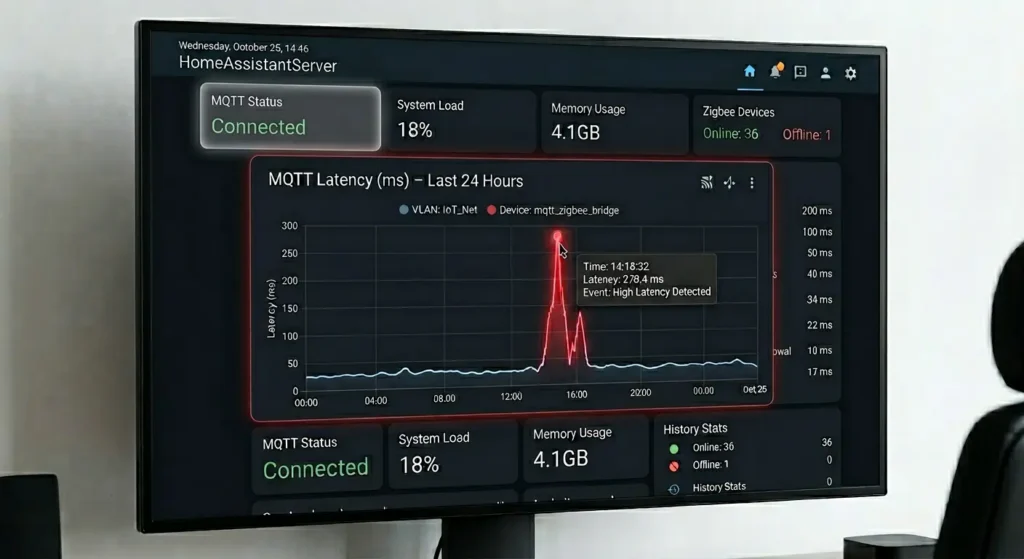
7.2 Add MQTT Latency Sensor to Home Assistant
YAML# In Home Assistant configuration.yaml:
mqtt:
  sensor:
    - name: "MQTT Latency"
      state_topic: "test/latency/measure"
      unit_of_measurement: "ms"
      value_template: >
        {{ (as_timestamp(now()) * 1000) | int - (value | int) }}
7.3 Set Up Alerts for Latency Spikes
YAML# Home Assistant automation:
automation:
  - alias: "Alert on High MQTT Latency"
    trigger:
      - platform: numeric_state
        entity_id: sensor.mqtt_latency
        above: 200
        for:
          minutes: 2
    action:
      - service: notify.mobile_app
        data:
          title: "⚠️ High MQTT Latency"
          message: "MQTT latency is {{ states('sensor.mqtt_latency') }}ms. Check your VLAN routing."
Real-World Scenario: From 3-Second Delays to Instant Response
Let me share a detailed real-world case that combines everything we’ve discussed.
The Setup
Mark (a member of the r/homeassistant subreddit) had this configuration:
- pfSense firewall running on a Protectli vault
- Home Assistant OS on an Intel NUC — VLAN 10 (192.168.10.50)
- Zigbee2MQTT on a Raspberry Pi 4 with Sonoff Zigbee 3.0 USB dongle — VLAN 20 (192.168.20.30)
- Mosquitto running as a Home Assistant add-on — VLAN 10 (192.168.10.50)
- 45 Zigbee devices: Aqara sensors, IKEA bulbs, Sonoff plugs
The Problem
- Light commands took 2-3 seconds to execute
- Motion sensor automations had 1.5-second delays
- Occasionally, devices showed as “unavailable” for 30-60 seconds
- The delays got worse during evening hours (6-10 PM)
The Diagnosis
Mark ran through these diagnostic steps:
Bash# Step 1: Ping test from Z2M Pi to HA NUC
ping -c 100 192.168.10.50
# Result: avg 1.2ms, 0% packet loss ← Routing is fine

# Step 2: MQTT connection test
mosquitto_pub -h 192.168.10.50 -p 1883 -t "test" -m "hello" -d
# Result: Connection took 1,847ms! ← Found it!

# Step 3: Check if it's DNS
mosquitto_pub -h homeassistant.local -p 1883 -t "test" -m "hello" -d
# Result: Connection took 3,200ms ← DNS is making it worse

# Step 4: Check firewall states
# pfSense → Diagnostics → States → Filter by port 1883
# Found: States were being created and destroyed rapidly
The Root Causes (There Were Three!)
- DNS Resolution: Z2M was configured with
homeassistant.local, causing mDNS lookups across VLANs that took 1,400ms - Firewall State Table: pfSense’s default state timeout was too aggressive, closing MQTT connections during idle periods
- Suricata IDS: Deep packet inspection was adding 200-400ms to every new connection
The Fixes Applied
Fix 1: Switch to IP address in Z2M config
YAMLmqtt:
  server: mqtt://192.168.10.50:1883  # Direct IP
Fix 2: Increase firewall state timeout for MQTT
text# pfSense → Firewall → Rules → VLAN20
# Edit the MQTT allow rule → Advanced Options:
# State Timeout: 3600 (1 hour instead of default)
# State Type: Keep State
Fix 3: Add Suricata pass rule for MQTT
textpass tcp 192.168.20.0/24 any -> 192.168.10.50 1883 (msg:"Pass MQTT"; sid:9000001;)
The Results
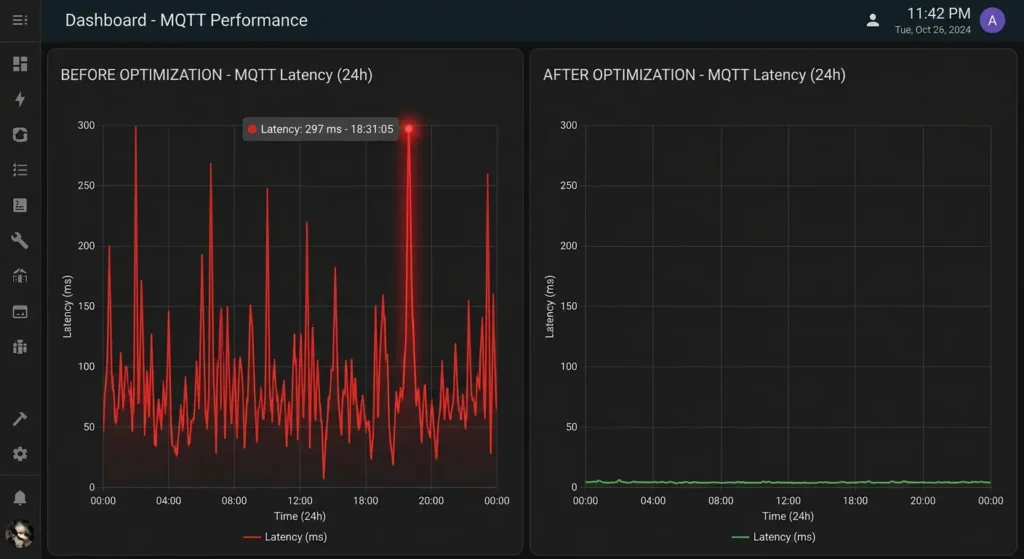
| Metric | Before | After | Improvement |
|---|---|---|---|
| MQTT Connection Time | 1,847ms | 12ms | 99.4% faster |
| Light Command Latency | 2,800ms | 45ms | 98.4% faster |
| Motion Sensor Response | 1,500ms | 38ms | 97.5% faster |
| Device Unavailability | 5-6 times/day | 0 times/day | 100% eliminated |
Mark’s exact words: “My smart home finally feels smart again. My wife stopped complaining about the lights. That alone was worth the 3 hours of troubleshooting.”
Common Mistakes That Cause VLAN Latency in Smart Homes
After helping dozens of users troubleshoot this issue, here are the mistakes I see over and over:
Mistake 1: Running Mosquitto as a Home Assistant Add-on in Cross-VLAN Setups
When Mosquitto runs as an HA add-on, it’s bound to Home Assistant’s VLAN. This means Z2M traffic must always cross the VLAN boundary. Consider running Mosquitto as a standalone Docker container on a machine that bridges both VLANs, or on the same VLAN as Z2M.
Mistake 2: Using QoS 2 for Everything
QoS 2 (exactly-once delivery) requires a 4-packet handshake for every message. Across VLANs, this quadruples your latency:
textQoS 0: Device → Broker (1 packet)           ~15ms cross-VLAN
QoS 1: Device → Broker → ACK (2 packets)    ~30ms cross-VLAN
QoS 2: Device → Broker → REC → REL → COMP   ~60ms cross-VLAN
Recommendation: Use QoS 1 for commands, QoS 0 for sensor data.
Mistake 3: Debug Logging in Production
Z2M with log_level: debug generates thousands of additional MQTT messages per hour. Each one crosses the VLAN boundary. Always use info or warn in production.
Mistake 4: Not Using TCP Keepalives
Without TCP keepalives, your firewall’s state table entry for the MQTT connection expires during idle periods. The next message triggers a full TCP handshake + TLS negotiation (if using TLS), adding 500-2000ms of latency.
Mistake 5: Blocking ALL Traffic Between VLANs and Then Adding Exceptions
Some users start with a “deny all” rule and then add specific allows. The problem? The firewall processes rules top to bottom, and if you have hundreds of rules, every packet is evaluated against many rules before finding a match.
Better approach: Place your most-used allow rules (like MQTT) at the very top of the rule list.
FAQ
Q1: What is the ideal latency between Home Assistant and Zigbee2MQTT?
A: In a well-configured setup, you should see under 50ms round-trip latency for MQTT messages, even across VLANs. Anything under 100ms feels instantaneous to users. If you’re consistently above 200ms, there’s definitely something to optimize. For reference, the Zigbee radio communication itself adds about 10-30ms, so your MQTT/network latency should ideally be lower than the radio latency.
Q2: Should I put Home Assistant and Zigbee2MQTT on the same VLAN?
A: From a pure performance standpoint, yes — same VLAN eliminates cross-VLAN routing entirely. But from a security standpoint, it depends on your threat model. If your IoT VLAN has cameras, cheap Chinese smart plugs, and other potentially compromised devices, you probably don’t want Home Assistant (which has access to your entire smart home) on that same network. The good news is that with proper configuration (as outlined in this guide), cross-VLAN latency can be reduced to negligible levels.
Q3: Does using MQTT over TLS (port 8883) add more latency over VLANs?
A: Yes, but the impact is minimal for persistent connections. The TLS handshake adds 50-150ms during initial connection, but once the TLS session is established, the encryption overhead is only about 1-3ms per message. The key is to ensure your MQTT connection stays alive (using keepalives) so you don’t repeatedly pay the TLS handshake cost. For cross-VLAN setups, I still recommend TLS because the IoT VLAN traffic passes through shared network infrastructure.
Q4: Can a slow Zigbee mesh cause symptoms similar to VLAN latency?
A: Absolutely! Before blaming VLANs, verify that your Zigbee mesh is healthy. Check your Zigbee2MQTT network map — if devices are routing through many hops or have weak link quality (LQI below 50), the delay might be in the Zigbee radio network, not the IP network. A good test: check the timestamps in Z2M logs. If the delay is between the Zigbee event and the MQTT publish, it’s a Zigbee issue. If the delay is between MQTT publish and HA receiving it, it’s a network/VLAN issue.
Q5: I’m using UniFi. Are there specific settings I should check?
A: Yes! UniFi has several settings that affect cross-VLAN performance:
- Threat Management (IDS/IPS): If enabled, it inspects inter-VLAN traffic. Set sensitivity to a reasonable level or create exceptions for MQTT traffic.
- Traffic Rules vs Firewall Rules: Use Firewall Rules (not Traffic Rules) for VLAN-to-VLAN policies — they’re processed at the hardware level and are faster.
- Auto-Optimize Network: Disable this. It can change settings without your knowledge.
- IGMP Snooping: Enable it on all VLANs with IoT devices.
- Multicast DNS: Enable it for VLANs that need cross-VLAN discovery.
Q6: How do I test if the latency is from the VLAN setup or from Zigbee2MQTT itself?
A: Run this simple test:
Bash# Test 1: Raw network latency
ping -c 100 [MQTT_BROKER_IP]

# Test 2: MQTT publish latency (bypassing Z2M)
time mosquitto_pub -h [BROKER_IP] -p 1883 -u user -P pass -t "test" -m "hello"

# Test 3: Z2M processing latency
# Check Z2M logs for the time between:
# "Received Zigbee message from [device]" and "MQTT publish: [topic]"
If Test 1 is fast but Test 2 is slow → Firewall/DNS issue
If Test 2 is fast but devices are slow → Z2M processing or Zigbee mesh issue
If Test 1 is slow → Basic routing problem
Q7: Will upgrading my router/firewall hardware reduce VLAN latency?
A: It depends on the bottleneck. If your firewall is running at high CPU utilization (check during peak smart home activity), then yes — a more powerful device will help. Common upgrades that make a real difference:
- Protectli VP2420 → VP4670: Faster inter-VLAN routing, more states
- Raspberry Pi (as router) → dedicated x86 appliance: Massive improvement
- UniFi USG → UDM Pro: Better inter-VLAN routing performance
But if your CPU is below 30% and latency is still high, the problem is configuration, not hardware.
Final Thoughts
Fixing high latency between Home Assistant and Zigbee2MQTT over VLANs isn’t about finding one magic setting — it’s about systematically eliminating every source of delay in the communication chain.
Let me summarize the priority order for fixes based on impact:
| Priority | Fix | Expected Impact |
|---|---|---|
| 🥇 | Use IP addresses instead of hostnames | 500-2000ms reduction |
| 🥈 | Optimize firewall rule order + disable DPI for MQTT | 200-500ms reduction |
| 🥉 | Set TCP_NODELAY on Mosquitto | 40-200ms reduction |
| 4 | Configure proper MQTT keepalives | Eliminates intermittent spikes |
| 5 | Enable IGMP snooping | Reduces network congestion |
| 6 | Fix MTU mismatches | Eliminates fragmentation delays |
| 7 | Upgrade to MQTT v5 | 10-30ms reduction |
Start with fixes 1 and 2 — they alone solve the problem for about 80% of users. If you’re still experiencing issues after that, work your way down the list.
Remember: VLANs are worth the effort. A properly segmented network with 45ms MQTT latency is infinitely better than a flat network where a compromised smart plug can access your NAS, your cameras, and your Home Assistant instance. Don’t sacrifice security for convenience — optimize both.
If you’re still stuck after trying everything in this guide, post your setup details on the Home Assistant Community Forum or the Zigbee2MQTT GitHub Discussions. Include your VLAN layout, firewall rules (sanitized), Z2M config, and the output of the diagnostic commands in this article. The community is incredibly helpful, and someone has likely solved your exact configuration before.
Useful External Resources:
- Zigbee2MQTT Official Documentation — MQTT Configuration
- Home Assistant MQTT Integration Documentation
- Eclipse Mosquitto Configuration Guide
- pfSense VLAN Best Practices
- Home Assistant Community Forum — Networking Category