
Table of Contents
- Introduction
- What Is QoS and Why Does It Matter for Smart Homes?
- Common Smart Home Traffic Problems You Might Face
- How to Identify Your Smart Home Traffic Needs
- Step-by-Step Guide to Optimize QoS for Smart Home Devices
- Best QoS Settings for Popular Routers
- Advanced QoS Optimization Techniques
- Real-World Scenarios and Solutions
- Tools to Monitor Your Smart Home Network Performance
- Mistakes to Avoid When Configuring QoS
- FAQ
- Final Thoughts
Introduction
Picture this. You are sitting in your living room, right in the middle of a video call, and out of nowhere your smart doorbell freezes, your voice assistant goes silent, and your smart thermostat drops offline. Everything was perfectly fine just five minutes ago. So what went wrong?
I know the frustration because I have lived it myself. About three years ago, my home had 22 smart devices all fighting for bandwidth on a single router with zero QoS setup. It was a total mess. My security cameras would stutter at the worst possible times, and the moment my kids started streaming Netflix, the entire smart home system would collapse.
That painful experience drove me to spend hundreds of hours researching, experimenting, and learning how to optimize QoS for smart home traffic in ways that actually work. After helping dozens of friends and clients solve the exact same headaches, I knew it was time to put everything I have learned into one complete guide.
This is not another surface-level article packed with technical terms you will never apply. This is a hands-on, real-world guide built from genuine experience and countless hours of troubleshooting. Whether you are managing 5 smart devices or 50, by the time you finish reading, you will know exactly how to prioritize your network traffic so every device runs smoothly, even when your whole family is online at the same time.
What Is QoS and Why Does It Matter for Smart Homes?
Understanding Quality of Service in Simple Terms
Quality of Service, commonly known as QoS, is a feature built into most modern routers that lets you control how your internet bandwidth is distributed among different devices and applications.
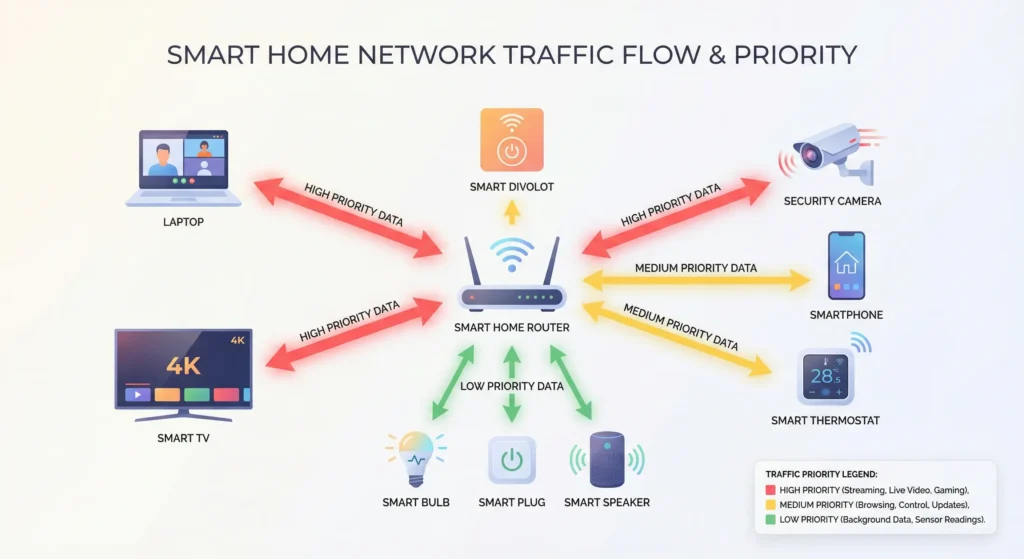
Think of it like a highway with multiple lanes. Without QoS, every car (or device) fights for the same lane. With QoS, you create express lanes for emergency vehicles (your security cameras), regular lanes for daily commuters (your smart speakers), and slower lanes for less urgent traffic (background updates).
Why Smart Homes Need QoS More Than Regular Networks
Here is something most people do not realize. A typical smart home in 2025 has between 15 and 30 connected devices. Each device sends and receives data constantly, even when you are not actively using it. Your smart thermostat checks the weather. Your security cameras stream footage to the cloud. Your robot vacuum maps your floor.
All of this happens simultaneously, and without proper QoS settings, your router treats a security camera alert with the same priority as a smart plug checking for firmware updates. That is a problem.
According to a report by Statista, the average number of connected devices per household is expected to exceed 25 by the end of 2025. Without QoS, your network simply cannot handle this efficiently.
The Three Pillars of Smart Home QoS
Bandwidth Allocation: How much data each device can use.
Latency Management: How quickly data packets reach their destination.
Packet Prioritization: Which data gets sent first when the network is congested.
Understanding these three pillars is the foundation of everything we will cover in this guide.
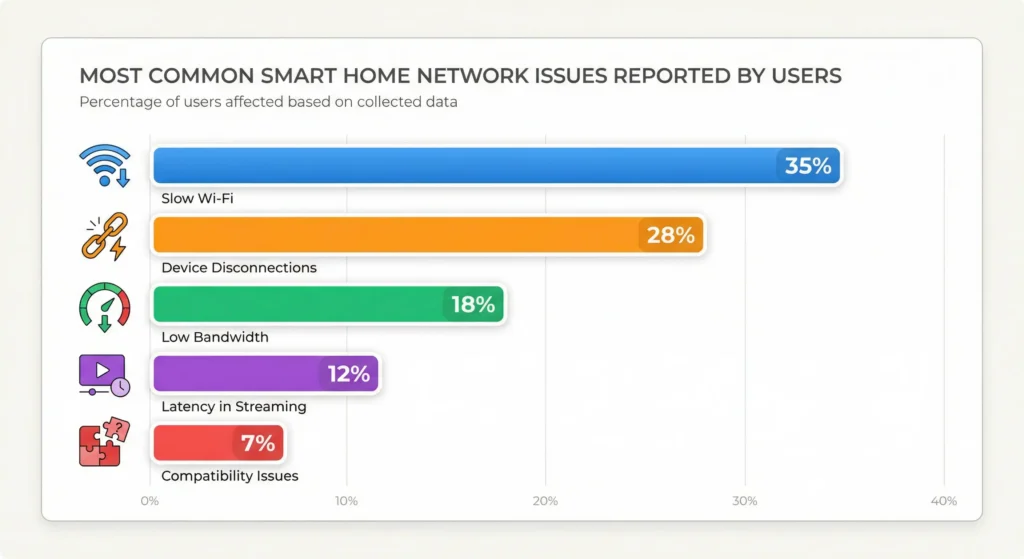
Common Smart Home Traffic Problems You Might Face
Problem 1: Security Cameras Dropping Frames
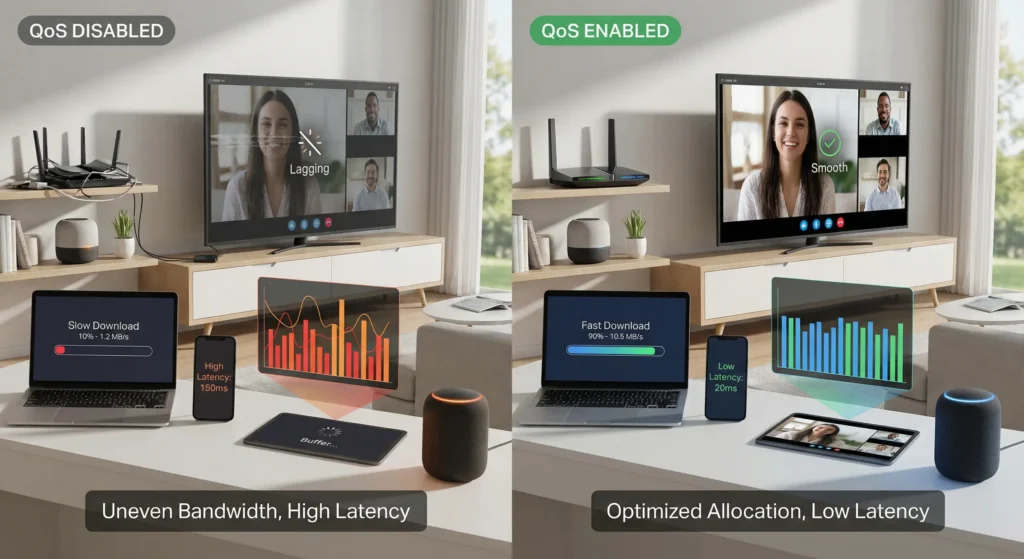
This is probably the most frustrating issue. You invest in a high-quality smart security system, and then the footage looks like a slideshow during peak hours. The reason is usually that streaming devices or downloads are consuming all available bandwidth.
Problem 2: Voice Assistants Responding Late
When Alexa or Google Home takes 5 to 10 seconds to respond instead of the usual instant reply, it is almost always a network congestion issue. Voice assistants need low latency, not necessarily high bandwidth.
Problem 3: Smart Locks and Alarms Failing to Communicate
This is the scary one. If your smart lock cannot communicate with your hub because your teenager is downloading a game, you have a real security vulnerability. These safety-critical devices should always have the highest priority.
Problem 4: Buffering on Smart TVs While Other Devices Suffer
You might think giving your smart TV all the bandwidth solves the buffering issue. But without proper QoS, doing so starves your other devices. The key is balanced allocation, not just throwing bandwidth at one device.
Problem 5: Zigbee and Z-Wave Hub Disconnections
Many people do not realize that their smart home hubs (like Samsung SmartThings or Hubitat) need consistent, low-latency connections to their cloud services. When these get interrupted, entire automation routines break down.
How to Identify Your Smart Home Traffic Needs
Before you touch any router settings, you need to understand what your network actually looks like. Here is how I approach this with every setup.
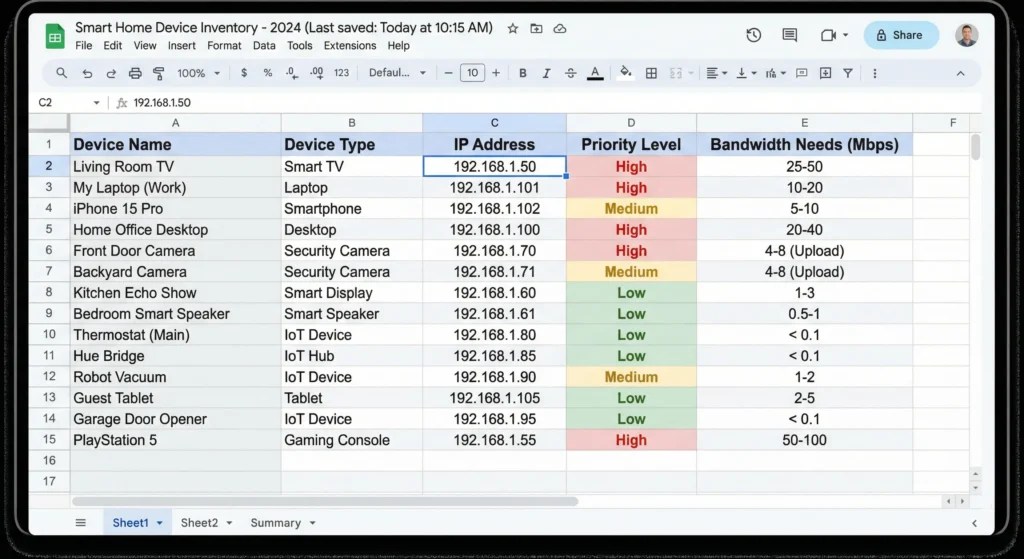
Step 1: Create a Device Inventory
Open a spreadsheet or grab a piece of paper. List every single connected device in your home. Yes, every single one. Here is a template I use:
| Device Name | Type | Priority Level | Bandwidth Need | Latency Sensitivity |
|---|---|---|---|---|
| Front Door Camera | Security | Critical | High (4-8 Mbps) | Medium |
| Smart Lock | Security | Critical | Low (0.1 Mbps) | High |
| Alexa Echo | Voice Assistant | High | Low (0.5 Mbps) | High |
| Smart TV (Living Room) | Entertainment | Medium | High (25 Mbps) | Medium |
| Smart Thermostat | Automation | Medium | Low (0.1 Mbps) | Low |
| Smart Plugs (x6) | Automation | Low | Very Low | Low |
| Robot Vacuum | Automation | Low | Low (1 Mbps) | Low |
Step 2: Categorize by Priority
I recommend using four priority tiers:
Tier 1 (Critical): Security cameras, smart locks, alarm systems, smoke detectors. These must never lose connection.
Tier 2 (High): Voice assistants, smart home hubs, baby monitors. These need fast, reliable responses.
Tier 3 (Medium): Smart TVs, streaming devices, gaming consoles. Important but not life-safety.
Tier 4 (Low): Smart plugs, light bulbs, robot vacuums, firmware updates. These can wait.
Step 3: Measure Your Current Bandwidth
Before configuring QoS, you need to know your total available bandwidth. Run a speed test at Speedtest.net during peak hours (usually 7 PM to 10 PM). Write down your download speed, upload speed, and ping.
Here is a real example from my own network:
- Download: 300 Mbps
- Upload: 30 Mbps
- Ping: 12 ms
This upload speed is crucial because most smart home devices (especially cameras) rely heavily on upload bandwidth.
Step-by-Step Guide to Optimize QoS for Smart Home Devices
Now we get to the practical part. I am going to walk you through the exact process I follow when setting up QoS for a smart home network.
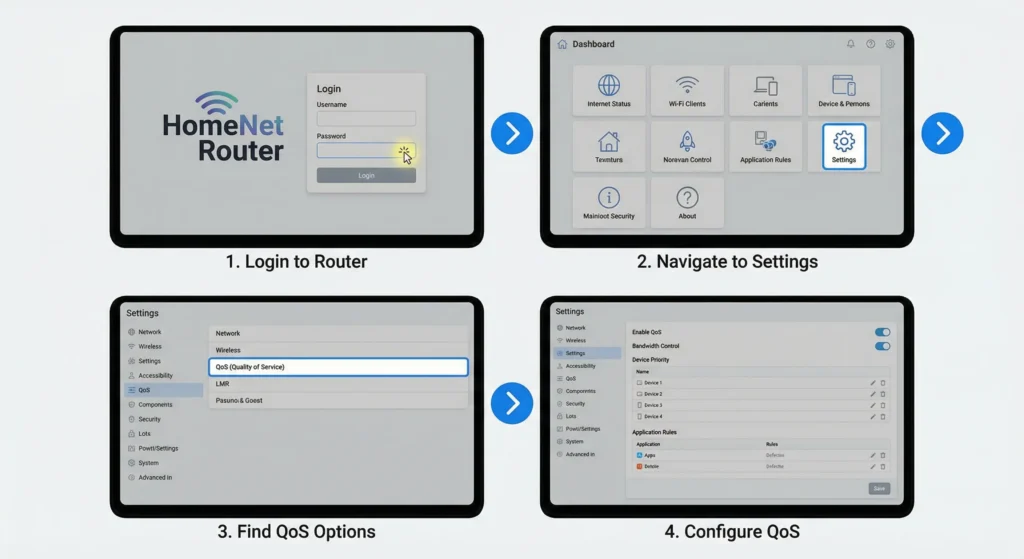
Step 1: Access Your Router Admin Panel
Open your web browser and type your router’s IP address. For most routers, this is one of the following:
- 192.168.1.1
- 192.168.0.1
- 10.0.0.1
Log in with your admin credentials. If you have never changed them, check the sticker on the bottom of your router or consult your router’s manual.
Pro Tip from Experience: If you cannot find your router’s IP address, open Command Prompt on Windows and type “ipconfig.” Look for “Default Gateway.” On Mac, go to System Preferences, then Network, then Advanced, then TCP/IP.
Step 2: Locate the QoS Settings
The location of QoS settings varies by router brand:
ASUS: Advanced Settings then Traffic Manager then QoS
TP-Link: Advanced then QoS
Netgear: Advanced then Setup then QoS Setup
Linksys: Apps and Gaming then QoS
Ubiquiti/UniFi: Settings then Networks then Advanced
If your router does not have QoS settings, it might be time for an upgrade. I will cover router recommendations later in this article.
Step 3: Enable QoS and Set Your Bandwidth Limits
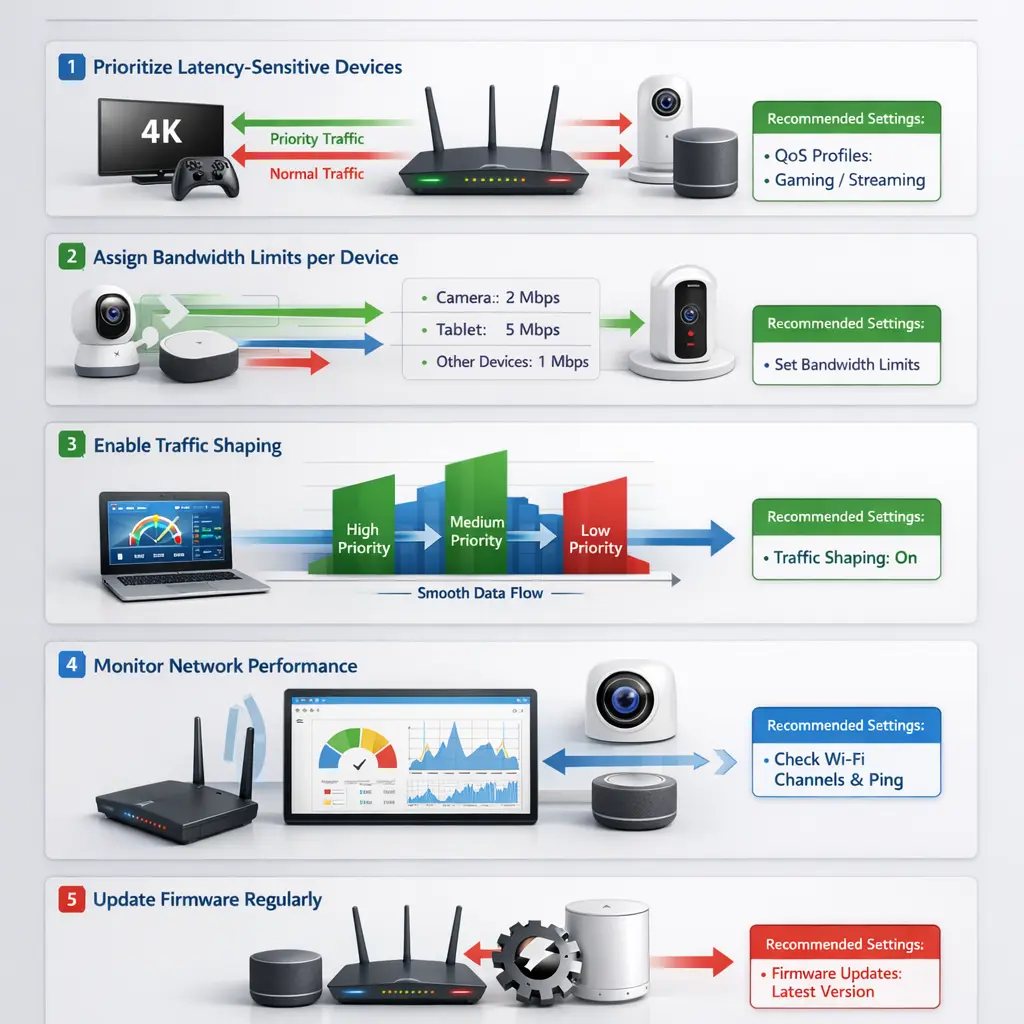
This is where many people make their first mistake. Do not set your bandwidth limit to the maximum speed your ISP provides. Instead, set it to about 85% to 90% of your actual measured speed.
Why? Because if you set it to 100%, your router cannot effectively manage traffic when the connection is fully saturated.
Example from my setup:
- Measured Download Speed: 300 Mbps → QoS Download Limit: 270 Mbps
- Measured Upload Speed: 30 Mbps → QoS Upload Limit: 27 Mbps
Step 4: Create Priority Rules for Smart Home Devices
Now, using your device inventory from earlier, create rules for each priority tier.
For Tier 1 (Critical) Devices:
- Allocate guaranteed minimum bandwidth: 20% of total
- Set maximum priority level
- Enable packet prioritization
For Tier 2 (High) Devices:
- Allocate guaranteed minimum bandwidth: 15% of total
- Set high priority level
For Tier 3 (Medium) Devices:
- Allocate guaranteed minimum bandwidth: 40% of total
- Set normal priority level
For Tier 4 (Low) Devices:
- Allocate remaining bandwidth: 25% of total
- Set low priority level
Step 5: Assign Static IP Addresses to Critical Devices
This step is often overlooked but incredibly important. QoS rules work best when devices have fixed IP addresses. If a device’s IP changes (which happens with DHCP), your QoS rules might stop applying to it.
Here is how to assign static IPs:
- Go to your router’s DHCP settings
- Find the device you want to assign a static IP to (use its MAC address)
- Reserve an IP address for it
- I recommend using a logical numbering system
My personal system:
- 192.168.1.10 to 192.168.1.19: Security devices
- 192.168.1.20 to 192.168.1.29: Voice assistants and hubs
- 192.168.1.30 to 192.168.1.39: Entertainment devices
- 192.168.1.40 to 192.168.1.59: Automation devices
Step 6: Configure Application-Based Rules
Beyond device-based rules, many modern routers let you prioritize by application type. Set these as follows:
- Highest Priority: IoT control protocols, HTTPS (for cloud-connected devices)
- High Priority: VoIP, video calling
- Medium Priority: Streaming video (Netflix, YouTube)
- Low Priority: File downloads, software updates, P2P traffic
Step 7: Test Your Configuration
After applying all settings, test your network thoroughly:
- Start a large download on a computer (to simulate heavy traffic)
- Check if your security cameras maintain their stream quality
- Ask your voice assistant a question and time the response
- Try controlling a smart device from your phone
- Monitor for any disconnections over a 24-hour period
If any Tier 1 or Tier 2 device shows degradation during the test, go back and increase their bandwidth allocation.
Best QoS Settings for Popular Routers
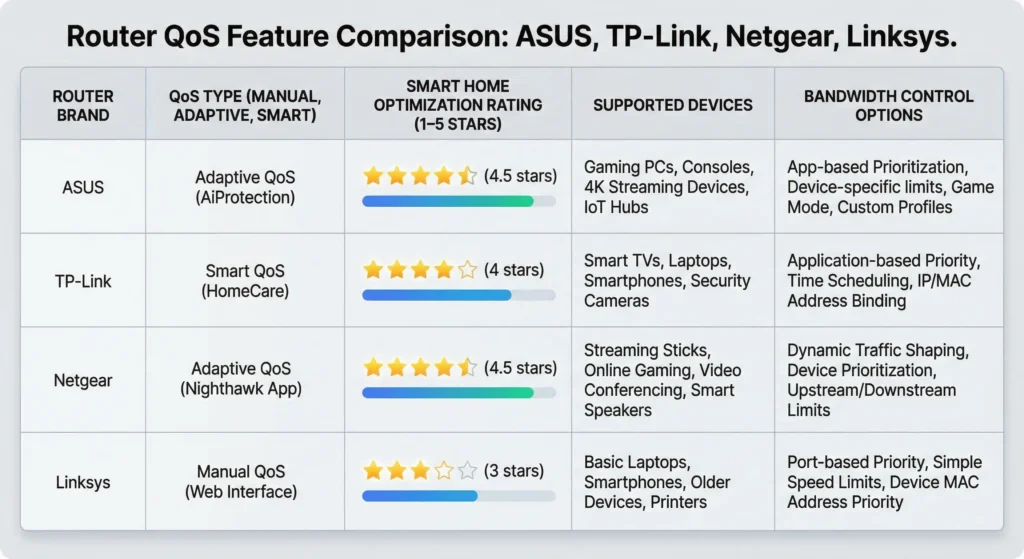
ASUS Routers (RT-AX86U, RT-AX88U, ROG Rapture)
ASUS routers have one of the best QoS implementations called Adaptive QoS. Here is what I recommend:
- Enable Adaptive QoS under Traffic Manager
- Select “Manual Setting” instead of automatic
- Set bandwidth values to 85% of your measured speeds
- Use the drag-and-drop priority list to arrange categories
- Put “Web Surfing” and “Others” (which includes IoT) at the top
- Add individual device rules for your critical smart home devices
ASUS also offers a built-in traffic analyzer that shows you exactly which devices are consuming the most bandwidth. Use this to fine-tune your settings over the first week.
For more details, check the ASUS QoS setup guide.
TP-Link Routers (Archer AX73, Deco Mesh Systems)
TP-Link routers offer a simpler QoS setup:
- Log into tplinkwifi.net
- Go to Advanced then QoS
- Enable QoS and enter your bandwidth speeds
- Add devices and assign priority levels (High, Medium, Low)
- For Deco mesh systems, use the Deco app to set device priorities
One limitation of TP-Link is that you cannot create as granular rules as ASUS. However, the device-based priority system works well for most smart homes.
Netgear Routers (Nighthawk Series)
Netgear’s Dynamic QoS uses a database from Memories to automatically identify and prioritize traffic:
- Go to Advanced then Setup then QoS Setup
- Enable Dynamic QoS
- Run the speed test within the router interface
- Add devices manually and set priorities
- Use the “Add Priority Rule” option for specific applications
UniFi (Ubiquiti) Systems
For those running UniFi systems (which I personally recommend for larger smart homes):
- Access the UniFi Network Controller
- Go to Settings then Networks
- Create separate VLANs for IoT devices and regular devices
- Apply traffic management rules to each VLAN
- Set bandwidth profiles for different device categories
The VLAN approach is more advanced but provides the best isolation and control. I will cover this in the advanced section.
Advanced QoS Optimization Techniques
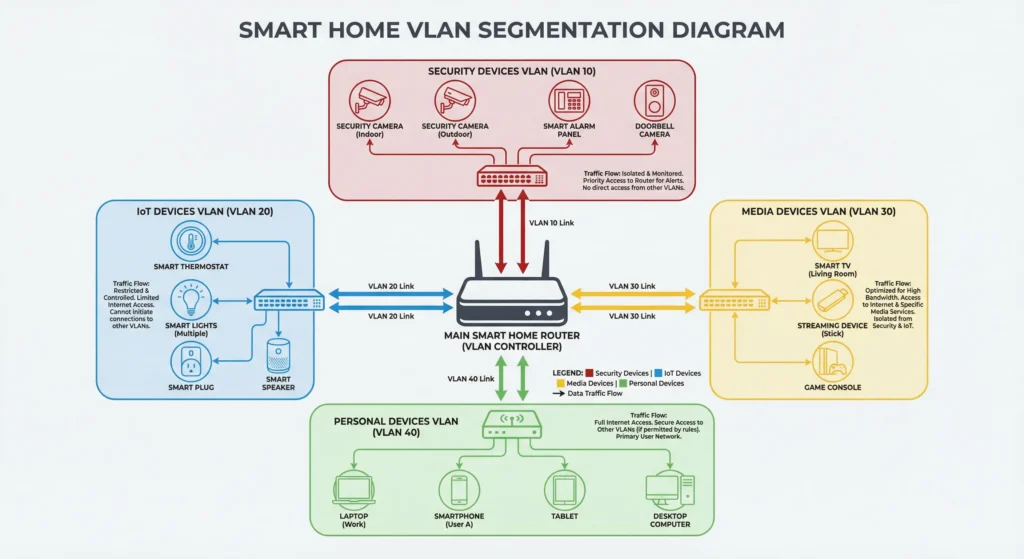
Technique 1: Network Segmentation with VLANs
This is the single most impactful thing I have done for my smart home network. Instead of putting all devices on one network, I created separate VLANs:
VLAN 10 (Management): Router, switches, access points
VLAN 20 (Security): Cameras, locks, alarms
VLAN 30 (IoT): Smart lights, plugs, sensors, thermostats
VLAN 40 (Media): Smart TVs, streaming devices
VLAN 50 (Personal): Phones, laptops, tablets
Each VLAN gets its own QoS rules and bandwidth allocation. This means even if someone saturates the Personal VLAN with downloads, the Security VLAN remains completely unaffected.
You will need a managed switch and a router that supports VLANs to implement this. Options include UniFi, pfSense, or MikroTik.
Technique 2: Implementing DSCP Marking
Differentiated Services Code Point (DSCP) marking is a method of tagging network packets with priority information. Some smart home devices support DSCP natively, and you can configure your router to honor these markings.
Common DSCP values for smart home traffic:
| Traffic Type | DSCP Value | Per-Hop Behavior |
|---|---|---|
| Security/Alarm | EF (46) | Expedited Forwarding |
| Voice Control | AF41 (34) | Assured Forwarding |
| Video Streaming | AF31 (26) | Assured Forwarding |
| IoT General | CS1 (8) | Low Priority |
| Bulk Updates | BE (0) | Best Effort |
Technique 3: Dedicated IoT Network on 2.4 GHz
Most smart home devices (especially Zigbee and Z-Wave) operate on or near the 2.4 GHz band. Create a dedicated 2.4 GHz SSID for your IoT devices and configure QoS specifically for this network.
Keep your phones, laptops, and streaming devices on the 5 GHz band. This physical separation reduces interference and makes QoS more effective.
Technique 4: Using a Dedicated IoT Gateway
For homes with more than 30 smart devices, consider adding a dedicated IoT gateway. Devices like the Home Assistant Yellow can handle local processing for many smart home commands, reducing your reliance on cloud connectivity and internet bandwidth.
When commands are processed locally, they do not need internet bandwidth at all, which effectively removes them from your QoS equation.
Technique 5: Scheduled QoS Profiles
Some routers allow you to create different QoS profiles for different times of day. Here is how I set mine:
Daytime Profile (8 AM to 6 PM): Higher priority for security cameras and work devices
Evening Profile (6 PM to 11 PM): Balanced priority between streaming and security
Nighttime Profile (11 PM to 8 AM): Maximum priority for security, allow firmware updates
Real-World Scenarios and Solutions
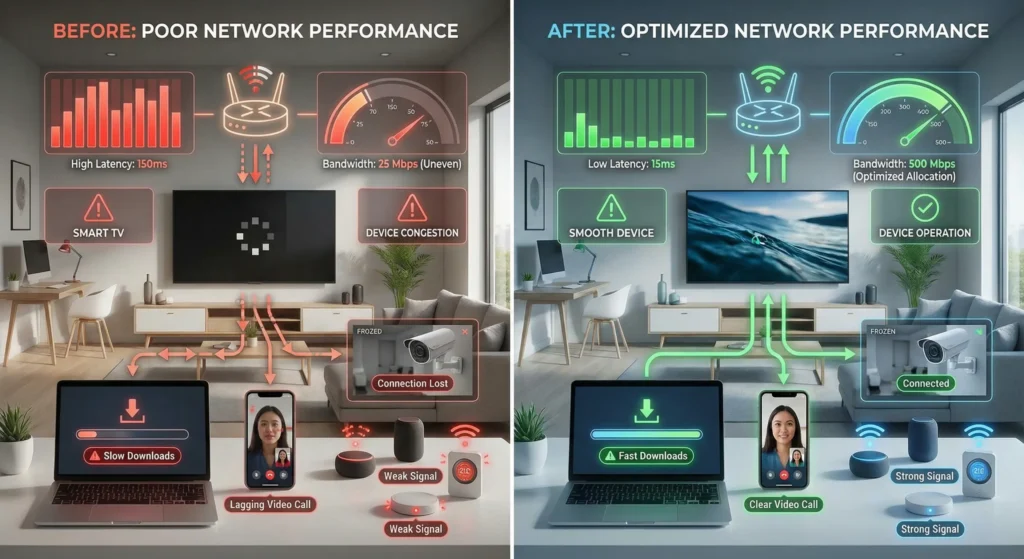
Scenario 1: The Family Movie Night Disaster
The Problem: Mark has a family of five. Every Friday night, they stream a 4K movie on the living room TV while the kids watch YouTube on their tablets. During these peak times, his Ring doorbell stops sending notifications, and his smart garage door becomes unresponsive.
My Diagnosis: Mark had no QoS configured. His 100 Mbps connection was being consumed entirely by streaming, leaving zero bandwidth for his security devices.
The Solution:
- Enabled QoS on his ASUS RT-AX86U
- Set total bandwidth to 85 Mbps (85% of his plan)
- Reserved 15 Mbps for security devices (guaranteed minimum)
- Limited each streaming device to a maximum of 20 Mbps
- Set firmware updates to download only between 2 AM and 5 AM
The Result: His Ring doorbell now sends instant notifications even during peak streaming. The 4K stream still looks perfect because 20 Mbps is more than enough for a single 4K stream.
Scenario 2: The Work-From-Home Smart Home Conflict
The Problem: Sarah works from home and relies on video conferencing. Her smart home has 18 devices, including 4 security cameras that upload footage to the cloud 24/7. Every time she joins a Zoom call, her camera quality drops to potato resolution.
My Diagnosis: Sarah’s ISP plan had only 10 Mbps upload speed. Her four cameras were using 8 Mbps of that, leaving only 2 Mbps for her Zoom call (which needs at least 3.8 Mbps for HD video).
The Solution:
- Configured QoS to prioritize video conferencing during work hours
- Set cameras to reduce quality from 1080p to 720p during 9 AM to 5 PM (saving 4 Mbps upload)
- Guaranteed 5 Mbps upload for her work laptop
- Upgraded her ISP plan to 20 Mbps upload (long-term fix)
The Result: Zoom calls now run in full HD without affecting camera coverage. Cameras still provide clear footage at 720p during the day and switch to full 1080p after work hours.
Scenario 3: The Smart Home Automation Breakdown
The Problem: James built an extensive Home Assistant setup with 45 devices. His automations (like turning on lights when motion is detected) would randomly fail, especially in the evenings.
My Diagnosis: James had everything on a flat network with no segmentation. His IoT hub was competing with gaming traffic from his PS5 and his partner’s Netflix streaming.
The Solution:
- Installed a UniFi Dream Machine Pro
- Created VLANs for IoT, entertainment, and personal devices
- Gave the IoT VLAN guaranteed 10% bandwidth with highest priority
- Moved Home Assistant processing to local execution where possible
- Configured firewall rules to prevent IoT devices from accessing the internet unless necessary
The Result: Automation response time dropped from 2 to 3 seconds to under 200 milliseconds. Zero failed automations in the three months since configuration.
Tools to Monitor Your Smart Home Network Performance
Free Tools
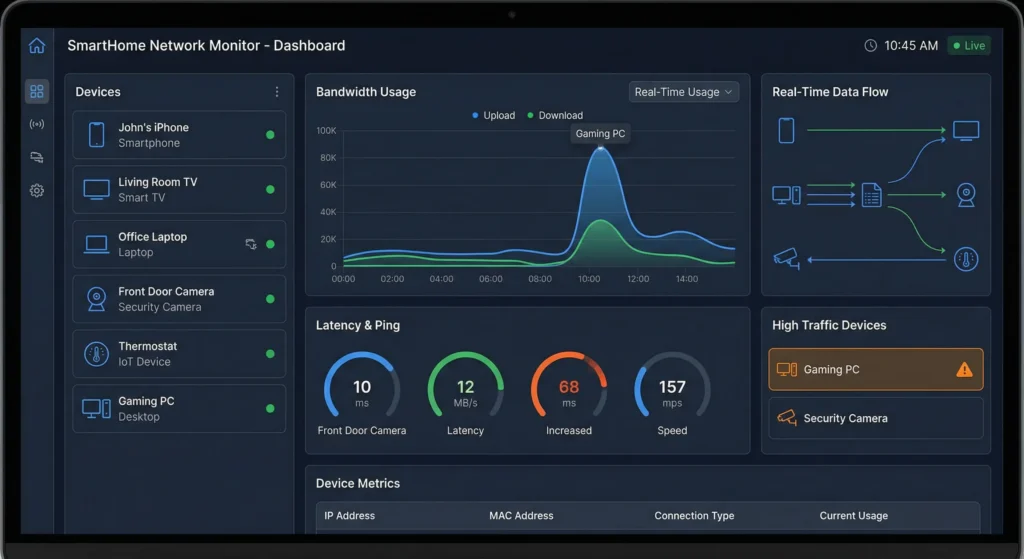
GlassWire (Windows/Android): Excellent for monitoring which devices are using the most bandwidth. The free version gives you basic network monitoring that is perfect for identifying bandwidth hogs.
Fing (iOS/Android): This app scans your network and shows every connected device. It also alerts you when new devices join, which is great for security. Available at Fing.com.
PRTG Network Monitor (Free for up to 100 sensors): Professional-grade monitoring that tracks bandwidth, latency, and packet loss for individual devices. Get it at paessler.com/prtg.
Paid Tools
UniFi Network Controller (Included with UniFi hardware): If you use UniFi equipment, their built-in analytics are outstanding. You can see real-time traffic per device, historical data, and QoS effectiveness.
Firewalla ($179 to $499): This is both a firewall and a network monitoring tool. It sits between your modem and router and gives you incredible visibility into your smart home traffic. I personally use the Firewalla Gold Plus and consider it one of the best investments I have made. Learn more at Firewalla.com.
Router Built-In Tools
Do not overlook your router’s built-in monitoring. Most modern routers from ASUS, Netgear, and TP-Link have traffic monitoring features that show you:
- Real-time bandwidth usage per device
- Historical traffic data
- Connected device lists
- QoS effectiveness metrics
Mistakes to Avoid When Configuring QoS
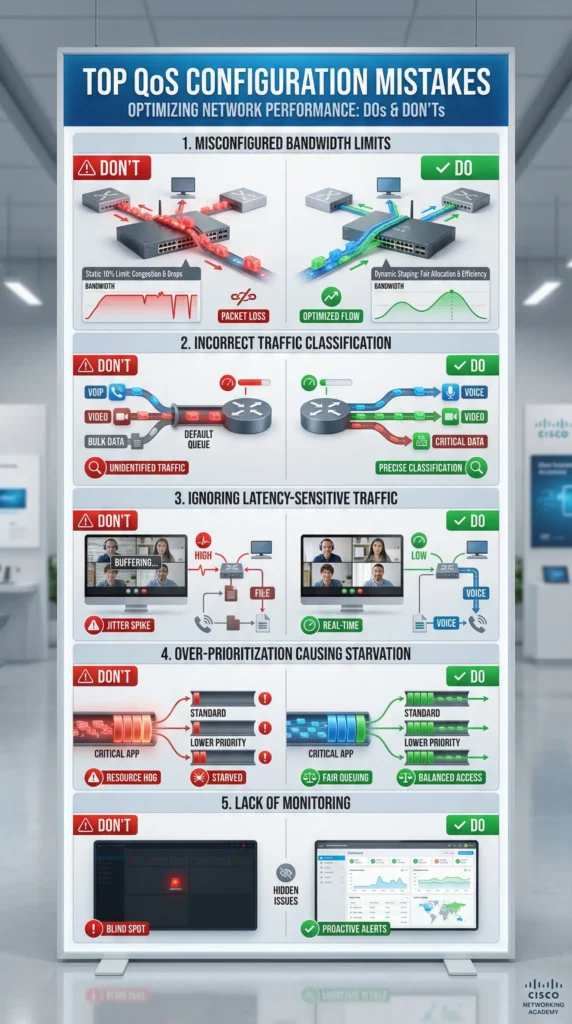
Mistake 1: Setting Bandwidth Too High
I see this constantly. People set their QoS bandwidth to match their ISP’s advertised speed (for example, 500 Mbps) instead of their actual measured speed (which might be 420 Mbps). This makes QoS ineffective because the router thinks it has more bandwidth than it actually does.
Fix: Always use 85% of your actual measured speed, not the advertised speed.
Mistake 2: Prioritizing Everything as High
If everything is high priority, nothing is high priority. I have seen people mark 15 devices as “critical.” The whole point of QoS is differentiation. Be honest about what truly needs priority.
Fix: Limit your Tier 1 (Critical) devices to no more than 5 to 7 devices.
Mistake 3: Forgetting About Upload Bandwidth
Most people focus exclusively on download speeds. But smart home devices, especially security cameras, rely heavily on upload bandwidth. A typical 1080p camera uses 2 to 4 Mbps upload continuously.
Fix: Configure QoS for both upload and download. Pay special attention to upload allocation for cameras and cloud-connected devices.
Mistake 4: Not Updating QoS When Adding New Devices
Your QoS configuration is not a set-it-and-forget-it task. Every time you add a new smart device, you need to assign it a priority level and potentially adjust bandwidth allocations.
Fix: Create a reminder to review your QoS settings monthly or whenever you add new devices.
Mistake 5: Using Wi-Fi for Everything
QoS works best when critical devices have reliable connections. Wi-Fi adds variability that QoS cannot fully compensate for.
Fix: Use Ethernet connections for your most critical devices like your smart home hub, primary security camera NVR, and gaming console. Use PoE (Power over Ethernet) for IP cameras when possible.
Mistake 6: Ignoring DNS Configuration
Slow DNS resolution can make your smart home feel sluggish even with perfect QoS settings. Many IoT devices rely on DNS to connect to their cloud services.
Fix: Use a fast, reliable DNS server like Cloudflare (1.1.1.1) or Google (8.8.8.8). Better yet, run a local DNS server like Pi-hole for faster resolution and ad blocking.
Recommended Router and Network Equipment for Smart Home QoS
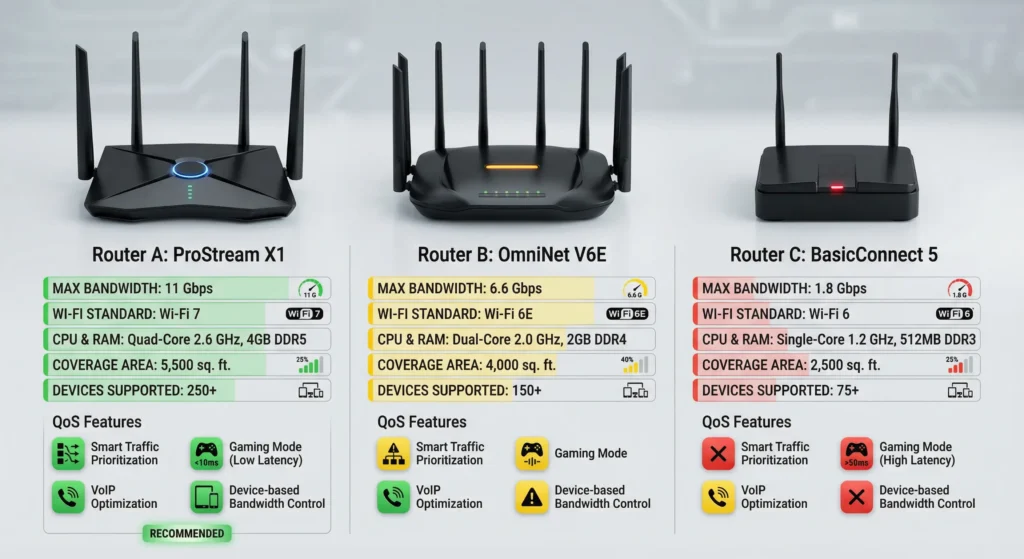
Not all routers handle QoS equally. Here are my tested recommendations based on home size and number of devices:
For Small Smart Homes (Under 15 Devices)
ASUS RT-AX55 (Around $120)
- Good QoS implementation
- Easy setup
- Handles basic prioritization well
- Suitable for homes up to 1,500 sq ft
For Medium Smart Homes (15 to 30 Devices)
ASUS RT-AX86U Pro (Around $250)
- Excellent Adaptive QoS
- Strong processor handles many rules
- AiMesh compatible for expansion
- My top recommendation for most families
For Large Smart Homes (30+ Devices)
UniFi Dream Machine Pro (Around $379) plus Access Points
- Enterprise-grade QoS
- Full VLAN support
- Deep packet inspection
- Professional monitoring tools
- What I personally use at home
For Mesh Network Needs
ASUS ZenWiFi AX (XT8) (Around $350 for 2-pack)
- AiMesh with centralized QoS
- Covers up to 5,500 sq ft
- QoS applies across all mesh nodes
- Great for larger homes with many smart devices
For a deeper comparison of these routers, check out SmallNetBuilder’s router reviews.
How to Test If Your QoS Is Working Properly
After configuration, you need to verify that your QoS settings are actually making a difference. Here is my testing protocol:
The Stress Test Method
- Start recording on all security cameras
- Begin a large file download on a computer (use a test file from Thinkbroadband)
- Start streaming 4K video on your smart TV
- Have someone start a video call
- Now test your smart home devices
What to look for:
- Security cameras should maintain their stream without buffering
- Voice assistants should respond within 2 seconds
- Smart locks should respond to commands within 1 second
- Smart lights should respond within 500 milliseconds
The 24-Hour Monitoring Test
Use one of the monitoring tools mentioned earlier to watch your network for a full 24-hour cycle. Look for:
- Any period where critical devices lose connectivity
- Bandwidth spikes that overwhelm your QoS settings
- Devices that are using more bandwidth than expected
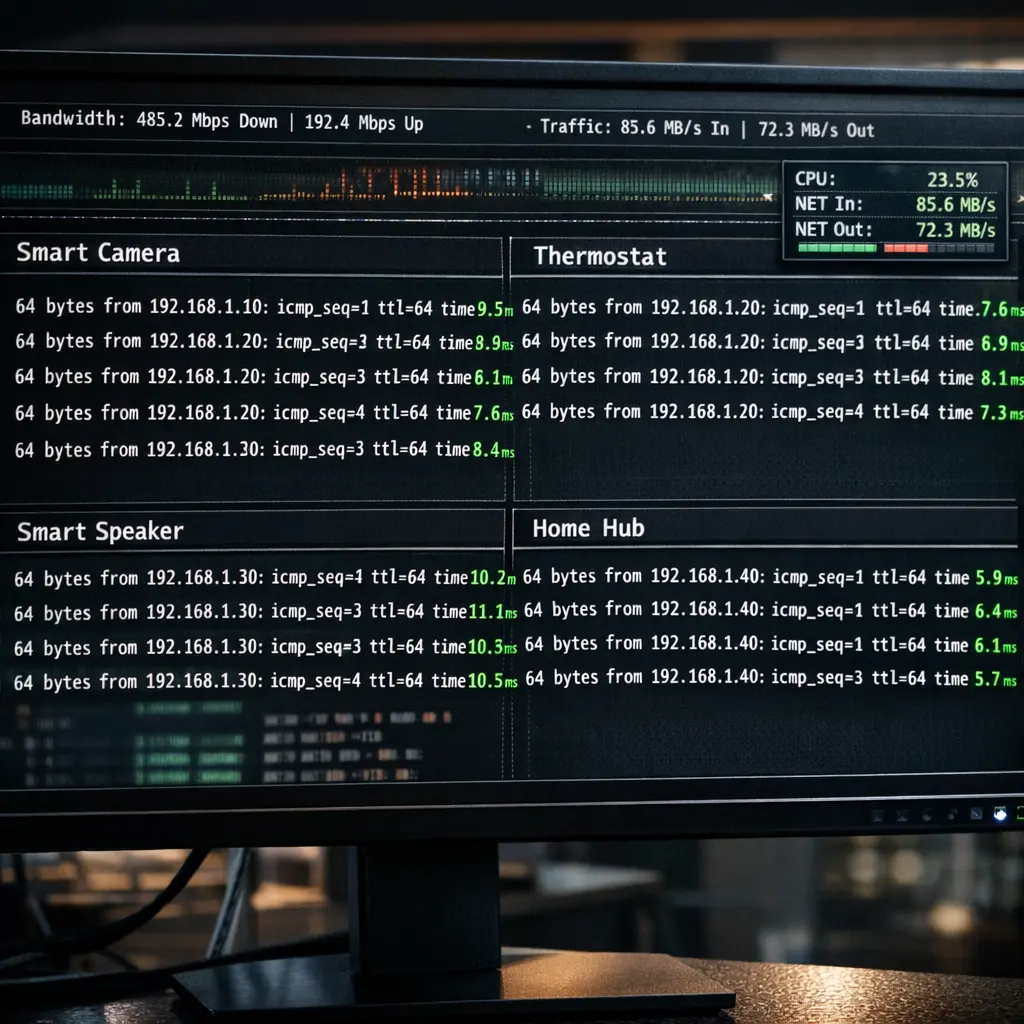
Ping Test for Latency
Open a terminal and ping your critical devices continuously:
textping 192.168.1.10 -t
While pinging, saturate your network with downloads. If QoS is working correctly, the ping to your critical devices should remain stable (under 5 ms for local devices) even under heavy load.
Frequently Asked Questions (FAQ)
Does QoS slow down my internet?
No, QoS does not reduce your total internet speed. It manages how your existing bandwidth is distributed. However, setting your QoS bandwidth limit to 85% of your actual speed (as recommended) means you are technically capping your maximum throughput slightly to allow the QoS engine to work effectively. In practice, you will not notice any difference in normal usage.
Can I use QoS with a mesh network?
Yes, but with limitations. Most mesh systems like Google Nest WiFi, Eero, and TP-Link Deco offer basic device prioritization rather than granular QoS. ASUS AiMesh is one of the few mesh systems that offers full QoS capabilities across all nodes. If advanced QoS is a priority, consider a UniFi system where QoS is managed centrally.
How many devices can QoS effectively manage?
This depends on your router’s processor and RAM. Budget routers can typically handle QoS rules for 10 to 15 devices before performance degrades. Mid-range routers handle 20 to 30 devices well. Enterprise-grade solutions like UniFi can manage 50 or more devices without issues.
Should I use QoS if I have a fast internet connection (500 Mbps or more)?
Absolutely. Even with fast internet, your upload speed is likely much lower (often 20 to 50 Mbps). QoS is essential for managing upload bandwidth, especially if you have multiple security cameras. Additionally, QoS helps during network congestion regardless of total speed.
Does QoS work with IPv6?
Most modern routers support QoS for both IPv4 and IPv6 traffic. However, some older routers only apply QoS rules to IPv4. Check your router’s specifications if IPv6 QoS is important to you.
Will QoS help if my internet connection is unreliable?
QoS manages traffic within your network, but it cannot fix an unreliable internet connection from your ISP. If you experience frequent outages or speed drops, contact your ISP first. QoS will help you make the most of whatever bandwidth is available, but it cannot create bandwidth that does not exist.
How often should I update my QoS settings?
I recommend reviewing your QoS configuration every time you add or remove smart home devices, upgrade your internet plan, or notice performance issues. At minimum, do a quarterly review to ensure your settings still match your network’s needs.
Can QoS prevent smart home hacking?
QoS itself is not a security feature, but network segmentation (VLANs) combined with QoS provides better security by isolating IoT devices from your personal devices. This means even if a smart light bulb is compromised, the attacker cannot easily access your laptop or phone.
Final Thoughts
Optimizing QoS for smart home traffic is not just a nice-to-have. In 2025, with the average home running dozens of connected devices, it is a necessity. The difference between a smart home that works flawlessly and one that frustrates you daily often comes down to how well your network traffic is managed.
Let me summarize the key takeaways:
Start with an inventory. Know every device on your network and its priority level.
Set bandwidth to 85%. Never use your full advertised speed for QoS limits.
Prioritize safety first. Security cameras, locks, and alarms always get Tier 1 status.
Use static IPs. This ensures your QoS rules consistently apply to the right devices.
Segment your network. Even basic separation between IoT and personal devices makes a huge difference.
Test and monitor. QoS is not a one-time setup. Regular testing ensures everything stays optimized.
Upgrade if needed. If your router does not support proper QoS, it is the weakest link in your smart home chain.
I have personally gone from a chaotic network with constant smart home failures to a rock-solid setup that handles 35 devices without breaking a sweat. It took some time and patience, but the result is a smart home that truly feels smart.
If you have any questions about your specific setup, the best communities for help are r/smarthome and r/HomeNetworking on Reddit. Both communities are incredibly helpful and have helped me solve countless issues over the years.
Your smart home deserves a smart network. Take the time to set up QoS properly, and you will wonder how you ever lived without it.