
Table of Contents
- Introduction: The Frustration Is Real
- What Is External Access to a Smart Home Dashboard?
- Top Reasons Smart Home Dashboards Fail Externally
- Real Scenario: When Everything Works at Home But Breaks Outside
- Network and Firewall Issues Blocking Remote Access
- SSL Certificate and HTTPS Problems
- DNS and Dynamic IP Challenges
- Authentication and Session Timeout Failures
- VPN Misconfigurations That Break Dashboard Access
- Reverse Proxy Errors and How to Fix Them
- Cloud vs Local: Why Some Dashboards Handle External Access Better
- Step-by-Step Guide to Fix External Dashboard Access
- Secure Solutions for Remote Smart Home Access
- Real User Experiences and Lessons Learned
- Common Mistakes to Avoid
- FAQ: Smart Home Dashboard External Access Issues
- Final Thoughts
Introduction: The Frustration Is Real
You have spent hours, maybe even days, setting up your smart home dashboard. Everything looks perfect. Lights respond instantly. Cameras stream smoothly. Temperature readings update in real time. You feel proud of what you have built.
Then you leave the house.
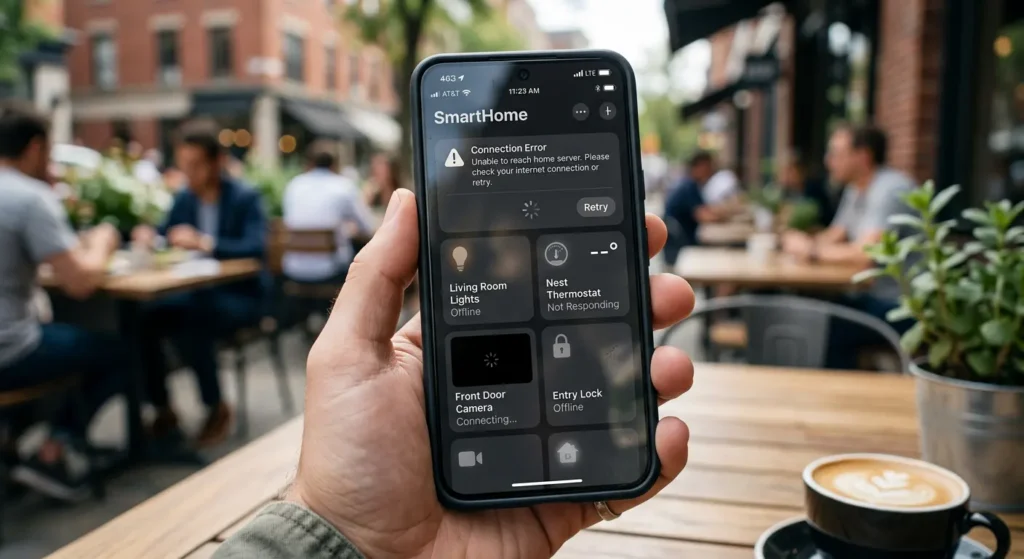
You open your phone, try to access your dashboard from a coffee shop or your office, and suddenly nothing works. The page does not load. The connection times out. Or worse, you get a scary security warning that makes you wonder if someone is trying to hack your system.
If this sounds familiar, you are not alone. Thousands of smart home enthusiasts face this exact problem every single day. I have personally dealt with this issue multiple times over the past several years while managing Home Assistant, OpenHAB, and other self-hosted dashboards. And I can tell you that the causes are almost always fixable once you understand what is actually going wrong.
In this comprehensive guide, I will walk you through every reason your smart home dashboard fail external access externally, share real experiences from actual users, and give you secure, practical solutions that work in 2025.
What Is External Access to a Smart Home Dashboard?
Before diving into the problems, let us clarify what external access actually means.
When you access your smart home dashboard while connected to your home Wi-Fi, your device communicates directly with your local server or hub. This is called local access. The data travels a very short distance, within your own network, and everything feels fast and responsive.
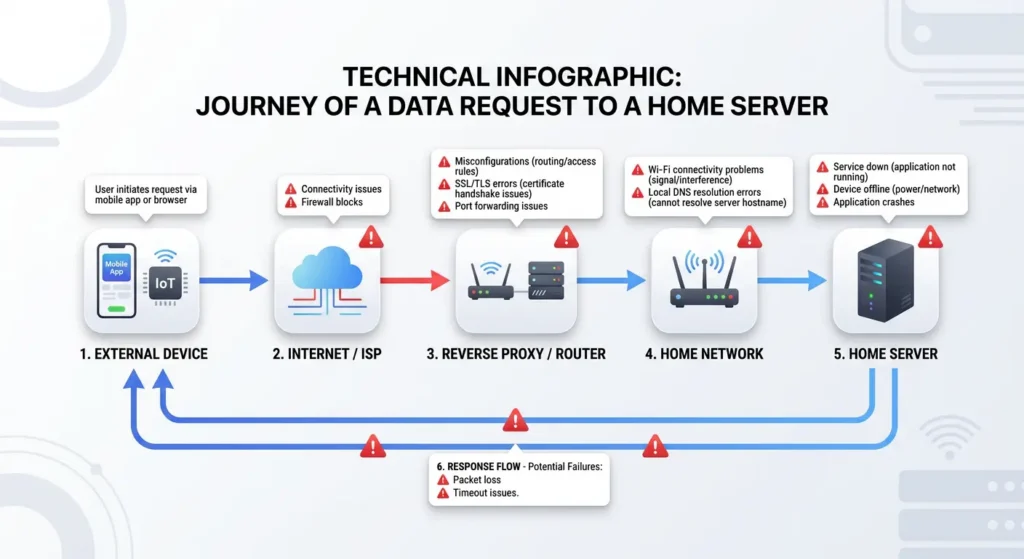
External access (also called remote access) happens when you try to reach that same dashboard from outside your home network. You might be at work, traveling, or simply using cellular data instead of your home Wi-Fi. In this case, your request has to travel through the internet, pass through your router, navigate firewalls, and reach your local server.
This journey introduces multiple points of failure that simply do not exist when you are at home.
Types of External Access Methods
| Method | Complexity | Security Level | Reliability |
|---|---|---|---|
| Port Forwarding | Low | Low | Medium |
| VPN (WireGuard, OpenVPN) | Medium | High | High |
| Reverse Proxy (Nginx, Caddy) | Medium-High | High | High |
| Cloud Relay (Nabu Casa, SmartThings) | Low | High | Very High |
| Cloudflare Tunnel | Medium | High | High |
| Tailscale / ZeroTier | Low | Very High | High |
Top Reasons Smart Home Dashboards Fail Externally
Based on my experience and extensive research across community forums, support tickets, and real-world troubleshooting sessions, here are the most common reasons your dashboard breaks when you step outside your front door.
1. Incorrect or Closed Port Forwarding
Your router acts as a gatekeeper. If the correct ports are not forwarded to your dashboard server, external requests simply cannot reach it.
2. Dynamic IP Address Changes
Most residential internet connections use dynamic IP addresses. Your public IP can change without warning, breaking any bookmarks or configurations that relied on the old address.
3. SSL/TLS Certificate Errors
Browsers have become extremely strict about security. If your SSL certificate is expired, self-signed, or misconfigured, your dashboard will either refuse to load or show alarming warnings.
4. Firewall Rules Blocking Incoming Traffic
Both your router firewall and your server firewall might be blocking the exact traffic you need to allow.
5. DNS Resolution Failures
If you are using a custom domain or dynamic DNS service, any misconfiguration means your domain name cannot translate to your actual IP address.
6. ISP Restrictions (CGNAT)
Some Internet Service Providers use Carrier-Grade NAT (CGNAT), which means you do not even have a real public IP address. This makes traditional port forwarding completely impossible.
7. Authentication and Session Issues
Tokens expire, sessions time out, and cookies do not persist across different networks. This leads to constant login failures or blank screens.
8. WebSocket Connection Failures
Many modern dashboards rely on WebSocket connections for real-time updates. These connections are often blocked by corporate firewalls, proxy servers, or misconfigured reverse proxies.
Real Scenario: When Everything Works at Home But Breaks Outside
Let me share a story that perfectly illustrates this problem.
A friend of mine, let us call him Ahmed, set up a beautiful Home Assistant dashboard to control his entire apartment. He configured automations for lights, AC, security cameras, and even his coffee machine. Everything worked flawlessly from his laptop and phone while he was home.
One day, Ahmed went on a business trip. He wanted to check his security cameras and adjust the thermostat remotely. He opened his browser, typed in the IP address he had bookmarked, and got nothing. The page would not load at all.
Panicking slightly, he tried his phone app. Same result. He called me, and together we diagnosed the problem over the phone.
Here is what went wrong:
Problem 1: Ahmed was using his local IP address (192.168.1.50) to access the dashboard. Local IP addresses are not reachable from the internet. They only work inside your home network.
Problem 2: He had never set up port forwarding on his router, so even if he used his public IP, the router would not know where to send the request.
Problem 3: His ISP had changed his public IP address two days before his trip. Even if port forwarding had been configured, the IP he knew was no longer valid.
We solved all three problems in about 45 minutes using a combination of Dynamic DNS and Cloudflare Tunnel. Ahmed has not had a single remote access failure since then.
This scenario plays out constantly in smart home communities worldwide.
Network and Firewall Issues Blocking Remote Access
Router Firewall Configuration
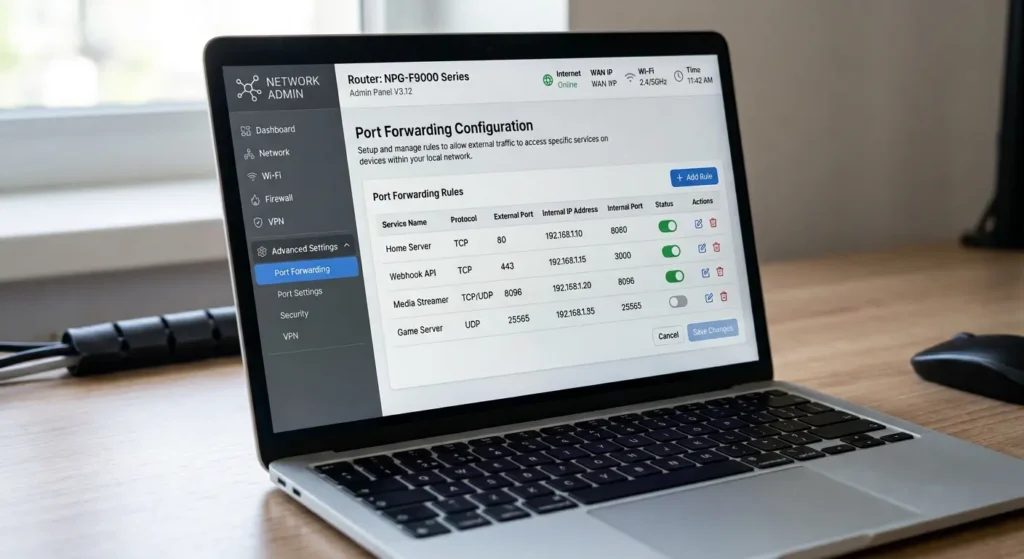
Your router is your first line of defense against unwanted traffic. By default, it blocks all incoming connections that were not initiated from inside your network. This is excellent for security but terrible for remote access.
When you try to access your dashboard externally, your request is an unsolicited incoming connection from the router’s perspective. Unless you have explicitly told the router to allow and forward this traffic, it will be silently dropped.
How to Diagnose Router Firewall Issues
- Log into your router’s admin panel (usually at 192.168.1.1 or 192.168.0.1)
- Navigate to the firewall or security settings
- Check if there are any rules that explicitly block incoming traffic on your dashboard’s port
- Look for port forwarding rules and verify they point to the correct internal IP and port
Server-Level Firewall
Even after your router allows the traffic through, your server (the device running your dashboard) has its own firewall. On Linux systems, this could be iptables, ufw, or firewalld. On Windows, it is the Windows Defender Firewall.
I have seen cases where users correctly configured port forwarding on their router but forgot to open the same port on their server’s firewall. The result is identical: the dashboard does not load externally.
Practical Fix for UFW (Ubuntu/Debian)
Bashsudo ufw allow 8123/tcp
sudo ufw status
This opens port 8123, which is the default port for Home Assistant. Replace the port number with whatever your dashboard uses.
SSL Certificate and HTTPS Problems
SSL certificate issues are one of the most common and most confusing problems for smart home users trying to access their dashboards externally.
Why SSL Matters for External Access
When you access your dashboard locally, your browser might not complain about an HTTP (non-encrypted) connection because you are on a trusted network. But when you access it externally, browsers like Chrome and Firefox will either warn you aggressively or outright refuse to load the page without valid HTTPS.
Common SSL Problems
Self-Signed Certificates: Many users generate their own SSL certificates. While these encrypt the traffic, browsers do not trust them because they are not issued by a recognized Certificate Authority (CA). You will see the dreaded “Your connection is not private” warning.
Expired Certificates: Let’s Encrypt certificates, the most popular free option, expire every 90 days. If your auto-renewal process fails silently, your certificate expires, and your dashboard becomes inaccessible.
Certificate Mismatch: If your certificate was issued for “home.example.com” but you are accessing “myhouse.example.com,” the browser will reject it.
Mixed Content Errors: Your dashboard loads over HTTPS, but some resources (images, scripts, WebSocket connections) are loaded over HTTP. Modern browsers block this mixed content.
How to Fix SSL Issues
Option 1: Use Let’s Encrypt with Auto-Renewal
Bashsudo certbot certonly --standalone -d yourdomain.com
sudo certbot renew --dry-run
Option 2: Use Cloudflare as a Proxy
Cloudflare provides free SSL certificates and acts as a middleman between your users and your server. This is one of the easiest ways to get valid HTTPS without managing certificates yourself.
Option 3: Use a Reverse Proxy with Built-in SSL
Caddy server automatically obtains and renews SSL certificates. It is incredibly simple to configure:
textyourdomain.com {
    reverse_proxy localhost:8123
}
That is literally all you need. Caddy handles everything else.
For more detailed SSL troubleshooting, check out Let’s Encrypt Documentation and Cloudflare SSL Guide.
DNS and Dynamic IP Challenges
The Dynamic IP Problem
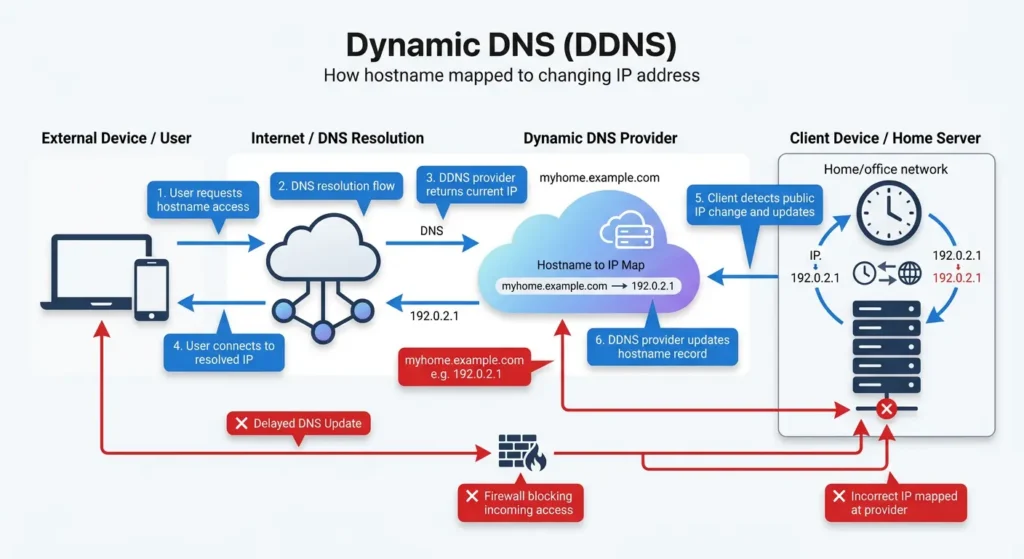
Most home internet connections use dynamic IP addresses. This means your public IP address can change at any time, usually when your router restarts or your ISP decides to reassign addresses.
Imagine you set up everything perfectly. Your dashboard is accessible at 203.0.113.45:8123. You bookmark it, test it, and it works. Three days later, your ISP changes your IP to 203.0.113.78. Your bookmark now points to nothing, or worse, to someone else’s network.
Dynamic DNS: The Solution
Dynamic DNS (DDNS) services solve this by giving you a hostname (like myhome.ddns.net) that automatically updates to point to your current IP address.
Popular DDNS Providers:
- DuckDNS (Free, open-source, works great with Home Assistant)
- No-IP (Free tier available, widely supported)
- Dynu (Free, supports multiple protocols)
- Cloudflare (Free if you own a domain)
Setting Up DuckDNS (Step by Step)
- Go to duckdns.org and sign in
- Create a subdomain (e.g., myhome.duckdns.org)
- Install the DuckDNS update client on your server
- Configure it to update your IP every 5 minutes
- Test by accessing your dashboard via the new hostname
The CGNAT Problem
Here is where things get really tricky. Some ISPs use Carrier-Grade NAT (CGNAT), which means multiple customers share the same public IP address. In this case, port forwarding is literally impossible because you do not have your own public IP.
How to check if you are behind CGNAT:
- Find your router’s WAN IP address (shown in router admin panel)
- Go to whatismyip.com and note your public IP
- If these two IPs are different, you are likely behind CGNAT
Solutions for CGNAT:
- Use Cloudflare Tunnel (completely bypasses CGNAT)
- Use Tailscale or ZeroTier (creates a virtual private network)
- Use Nabu Casa if you are on Home Assistant (cloud relay service)
- Contact your ISP and request a public IP (some ISPs offer this for a small fee)
Authentication and Session Timeout Failures
Why Sessions Break Externally
When you log into your dashboard at home, your browser stores a session cookie. This cookie tells the server “this user is already authenticated.” Locally, this works reliably because the network path never changes.
Externally, several things can disrupt this:
IP-Based Session Validation: Some dashboard platforms tie your session to your IP address. When you access from a different network, your IP changes, and the server invalidates your session.
Cookie Domain Mismatch: If your dashboard is configured for “192.168.1.50” but you access it via “myhome.duckdns.org,” the cookies set for one address will not be sent to the other.
Corporate Network Interference: If you are accessing from a workplace, the corporate proxy or firewall might strip cookies from your requests or modify headers.
Token Expiration: API tokens used by mobile apps have expiration times. If your token expires while you are away from home, the app cannot authenticate.
How to Fix Authentication Issues
- Configure your dashboard to use the external URL as its primary address so cookies are consistent
- Extend session timeout values in your dashboard configuration
- Use long-lived access tokens for mobile app connections
- Enable multi-factor authentication instead of relying on IP-based security
For Home Assistant users, you can set the external URL in the configuration:
YAMLhomeassistant:
  external_url: "https://myhome.duckdns.org:8123"
  internal_url: "http://192.168.1.50:8123"
VPN Misconfigurations That Break Dashboard Access
VPN as a Remote Access Solution
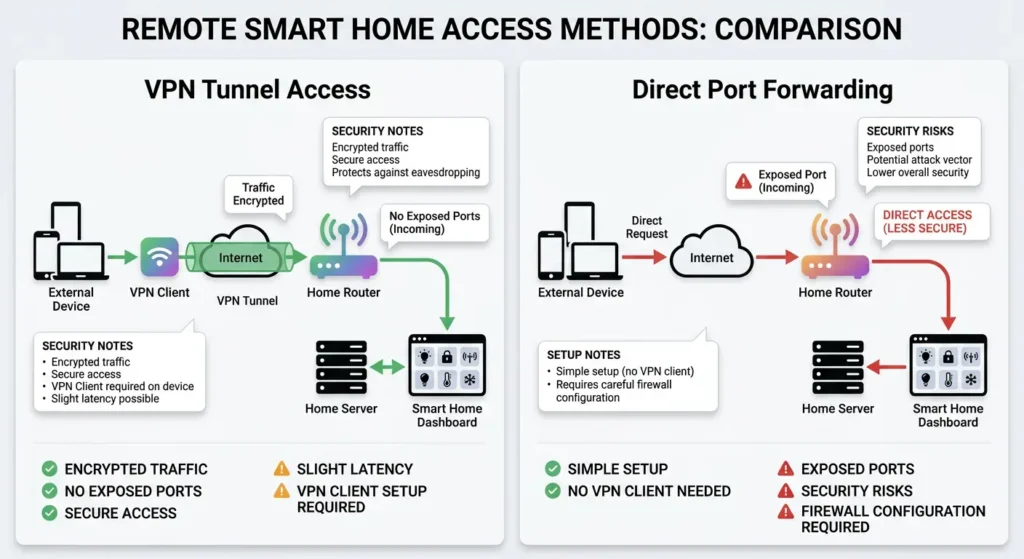
Using a VPN is one of the most secure ways to access your smart home dashboard externally. Instead of exposing your dashboard directly to the internet, you connect to your home network through an encrypted tunnel. Your device behaves as if it were physically at home.
However, VPN misconfigurations are surprisingly common and can make external access fail in subtle ways.
Common VPN Problems
Split Tunneling Not Configured: By default, many VPN setups route ALL your internet traffic through the VPN. This means your browsing speed drops dramatically, and some websites might not work. You only need your smart home traffic to go through the VPN.
DNS Leak: Your device resolves domain names using your current network’s DNS server instead of your home DNS. This means local hostnames like “homeassistant.local” will not resolve.
MTU Mismatch: The Maximum Transmission Unit size might be too large for the VPN tunnel, causing packets to be silently dropped. Your dashboard partially loads or loads extremely slowly.
Wrong Subnet Configuration: Your home network uses 192.168.1.0/24 and your VPN assigns addresses in the same range. This creates routing conflicts that prevent proper communication.
WireGuard: The Recommended VPN Solution
WireGuard has become the gold standard for home VPN setups. It is faster, simpler, and more reliable than OpenVPN for most use cases.
Basic WireGuard Server Configuration:
ini[Interface]
Address = 10.0.0.1/24
ListenPort = 51820
PrivateKey = YOUR_SERVER_PRIVATE_KEY

[Peer]
PublicKey = YOUR_CLIENT_PUBLIC_KEY
AllowedIPs = 10.0.0.2/32
Client Configuration (on your phone or laptop):
ini[Interface]
Address = 10.0.0.2/24
PrivateKey = YOUR_CLIENT_PRIVATE_KEY
DNS = 192.168.1.1

[Peer]
PublicKey = YOUR_SERVER_PUBLIC_KEY
Endpoint = myhome.duckdns.org:51820
AllowedIPs = 192.168.1.0/24, 10.0.0.0/24
Notice the AllowedIPs line in the client config. By specifying only your home network ranges, you enable split tunneling. Only traffic destined for your home network goes through the VPN.
Learn more about WireGuard setup at wireguard.com.
Reverse Proxy Errors and How to Fix Them
What Is a Reverse Proxy?
A reverse proxy sits between the internet and your dashboard server. It receives external requests, processes them, and forwards them to your dashboard. Think of it as a receptionist who screens visitors before letting them into the building.
Popular reverse proxy options include Nginx Proxy Manager, Caddy, Traefik, and HAProxy.
Common Reverse Proxy Mistakes
WebSocket Support Not Enabled: Smart home dashboards use WebSockets for real-time communication. If your reverse proxy does not properly handle WebSocket upgrade requests, your dashboard might load initially but then fail to update or disconnect repeatedly.
Nginx WebSocket Configuration Fix:
nginxlocation / {
    proxy_pass http://192.168.1.50:8123;
    proxy_set_header Host $host;
    proxy_set_header X-Real-IP $remote_addr;
    proxy_http_version 1.1;
    proxy_set_header Upgrade $http_upgrade;
    proxy_set_header Connection "upgrade";
}
The last three lines are critical. Without them, WebSocket connections will fail.
Incorrect Headers: Your dashboard might need specific headers to function correctly. If the reverse proxy strips or modifies these headers, features break.
Timeout Settings Too Low: Default proxy timeout values are often 60 seconds. Complex dashboard operations might take longer, causing the proxy to terminate the connection prematurely.
Buffer Size Too Small: If your dashboard sends large responses (like camera feeds or detailed graphs), insufficient buffer sizes cause partial loading or errors.
Nginx Proxy Manager: The Easy Way
If command-line configuration intimidates you, Nginx Proxy Manager provides a web-based GUI for managing your reverse proxy. It even handles SSL certificates automatically through Let’s Encrypt.
You can find the official setup guide at nginxproxymanager.com.
Cloud vs Local: Why Some Dashboards Handle External Access Better
Not all smart home dashboards are created equal when it comes to external access. Understanding the architectural differences helps explain why some work seamlessly and others require significant configuration.
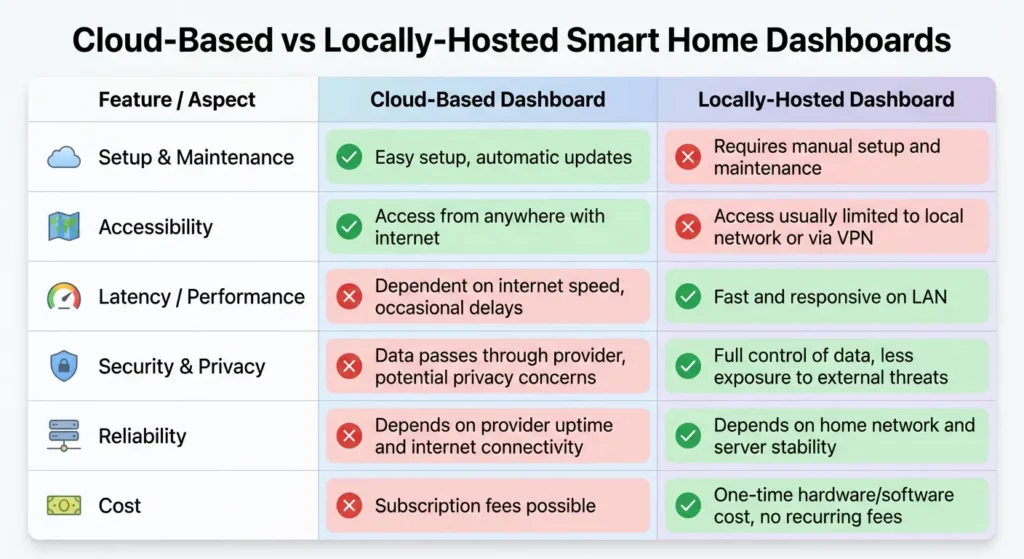
Cloud-Based Dashboards
Platforms like Samsung SmartThings, Google Home, and Amazon Alexa are inherently cloud-based. Your devices communicate with the manufacturer’s servers, and you access the dashboard through their servers. External access works by default because there is no “local” component to reach.
Advantages:
- Zero configuration for remote access
- Always accessible from anywhere
- Automatic updates and maintenance
Disadvantages:
- Dependent on internet connectivity
- Privacy concerns (your data lives on their servers)
- Service can be discontinued at any time
- Latency for local automations
Locally-Hosted Dashboards
Platforms like Home Assistant, OpenHAB, Hubitat, and Domoticz run on hardware inside your home. This gives you complete control and privacy, but remote access requires manual setup.
Advantages:
- Full control over your data
- Works even without internet (locally)
- Highly customizable
- No dependency on third-party services
Disadvantages:
- Remote access requires technical configuration
- You are responsible for security
- Hardware maintenance is on you
Hybrid Approach: The Best of Both Worlds
The smartest approach combines local processing with a secure cloud relay for external access. Home Assistant’s Nabu Casa service is a perfect example. Your automations run locally, but Nabu Casa provides a secure, encrypted tunnel for remote access without any port forwarding, DNS configuration, or VPN setup.
At $6.50 per month, it eliminates virtually all the technical challenges discussed in this article while supporting the open-source project.
Step-by-Step Guide to Fix External Dashboard Access
Here is a systematic approach to diagnosing and fixing external access issues. Follow these steps in order.
Step 1: Verify Local Access Works
Before troubleshooting remote access, confirm your dashboard works perfectly on your local network. Open it from a device connected to your home Wi-Fi. If it does not work locally, fix that first.
Step 2: Identify Your Public IP Address
Visit whatismyip.com from a device on your home network. Note your public IP address.
Step 3: Check for CGNAT
Compare your public IP with the WAN IP shown in your router’s admin panel. If they match, you have a real public IP. If they differ, you are behind CGNAT and need to use tunnel-based solutions.
Step 4: Set Up Port Forwarding (If Not Behind CGNAT)
In your router’s admin panel:
- Forward external port 443 (HTTPS) to your server’s internal IP and dashboard port
- Save and apply the changes
Step 5: Configure Dynamic DNS
Set up a DDNS service to handle IP changes:
- Create an account at DuckDNS, No-IP, or similar
- Configure your router or server to update the DDNS record automatically
Step 6: Set Up SSL/TLS
Install a valid SSL certificate:
- Use Let’s Encrypt with Certbot
- Or use Caddy for automatic SSL
- Or use Cloudflare proxy for free SSL
Step 7: Test External Access
Disconnect from your home Wi-Fi and use cellular data. Try accessing your dashboard through the DDNS hostname (e.g., https://myhome.duckdns.org).
Step 8: Troubleshoot If Still Failing
- Check router firewall logs for blocked connections
- Check server firewall (ufw, iptables) for denied traffic
- Test port accessibility using yougetsignal.com
- Verify DNS resolution using
nslookup myhome.duckdns.org
Secure Solutions for Remote Smart Home Access
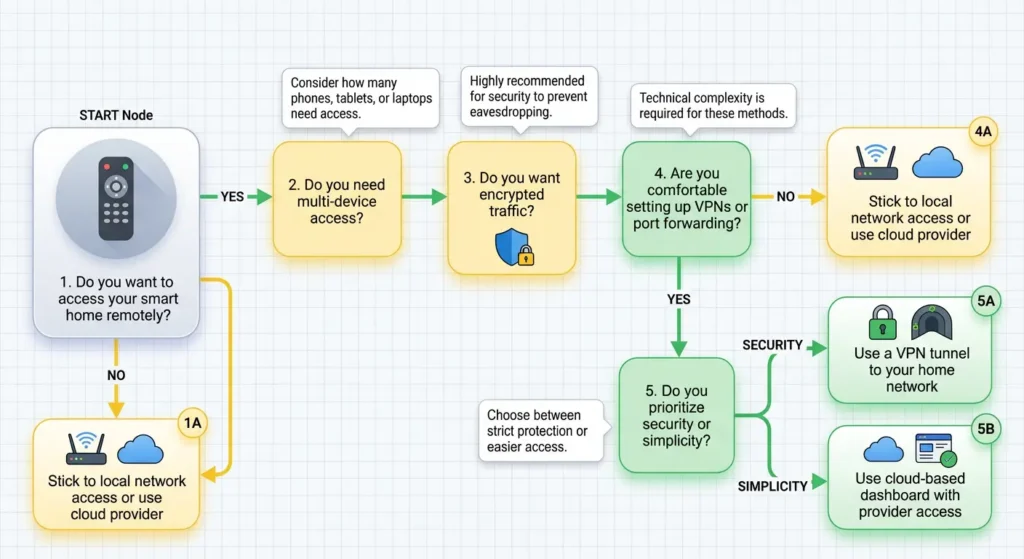
Security should never be an afterthought. Exposing your smart home to the internet without proper protection is like leaving your front door wide open.
Solution 1: Cloudflare Tunnel (Highly Recommended)
Cloudflare Tunnel creates a secure outbound connection from your server to Cloudflare’s network. No ports need to be opened on your router. No public IP required. Works even behind CGNAT.
Setup Process:
- Create a free Cloudflare account
- Add your domain to Cloudflare
- Install
cloudflaredon your server - Create a tunnel and configure it to point to your dashboard
Bashcloudflared tunnel create myhome
cloudflared tunnel route dns myhome home.yourdomain.com
Learn more at Cloudflare Tunnel Documentation.
Solution 2: Tailscale (Easiest VPN)
Tailscale is a mesh VPN built on WireGuard. It is incredibly easy to set up and works across all platforms.
- Install Tailscale on your server and your mobile devices
- Log in with the same account on all devices
- Access your dashboard using the Tailscale IP address
No port forwarding. No DNS configuration. No CGNAT issues. It just works.
Visit tailscale.com for setup instructions.
Solution 3: Nabu Casa (Home Assistant Only)
If you use Home Assistant, Nabu Casa is the official cloud relay service. It provides:
- Encrypted remote access
- Google Assistant and Alexa integration
- Support for the open-source project
Solution 4: ZeroTier
Similar to Tailscale, ZeroTier creates a virtual network. It is free for up to 25 devices and works well for smart home access.
Setup guide available at zerotier.com.
Real User Experiences and Lessons Learned
Experience 1: The Port Forwarding Nightmare
A user on the Home Assistant community forums shared how he spent an entire weekend trying to get port forwarding to work. His ISP was using CGNAT, but he did not know what that was. After hours of frustration, another community member suggested he check his router’s WAN IP against his public IP. They did not match. The solution was switching to Cloudflare Tunnel, which took only 20 minutes to set up.
Lesson: Always check for CGNAT before attempting port forwarding.
Experience 2: The SSL Certificate That Expired Silently
A Reddit user reported that her Home Assistant dashboard suddenly stopped working remotely after three months. Everything had been perfect. The culprit was an expired Let’s Encrypt certificate. Her renewal cron job had stopped running after a system update.
Lesson: Set up monitoring for your SSL certificates. Services like UptimeRobot can alert you when your site goes down.
Experience 3: The Corporate Firewall Block
An IT professional shared that his smart home dashboard worked perfectly from his phone on cellular data but never from his office laptop. The reason was that his company’s firewall blocked WebSocket connections and non-standard ports. Using Cloudflare Tunnel with standard HTTPS (port 443) solved the issue completely.
Lesson: Always use standard ports (443 for HTTPS) and ensure WebSocket connections work through your reverse proxy.
Experience 4: The Accidental Public Exposure
A user on a smart home forum accidentally exposed his Home Assistant instance to the internet without authentication. Someone found it through Shodan (a search engine for internet-connected devices) and started controlling his lights at 2 AM. Terrifying.
Lesson: Never expose your dashboard without strong authentication. Always use HTTPS. Consider IP whitelisting or geo-blocking as additional layers.
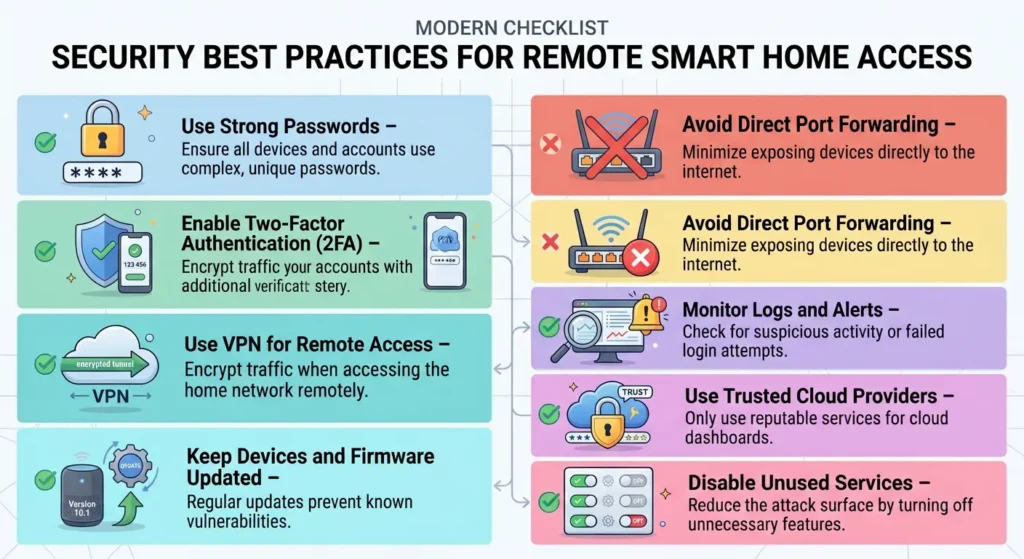
Common Mistakes to Avoid
Mistake 1: Using HTTP Instead of HTTPS
Never access your smart home dashboard over unencrypted HTTP, especially externally. Your credentials and data travel in plain text, visible to anyone on the same network.
Mistake 2: Using Default Passwords
Change default passwords on your dashboard, router, and any connected devices immediately. Use strong, unique passwords for each.
Mistake 3: Opening Too Many Ports
Only forward the ports you absolutely need. Every open port is a potential entry point for attackers.
Mistake 4: Ignoring Software Updates
Keep your dashboard software, operating system, and router firmware up to date. Security vulnerabilities are discovered regularly, and updates patch them.
Mistake 5: Not Setting Up a Backup
If your configuration breaks during remote access setup, you need a way to restore it. Always create backups before making changes.
Mistake 6: Sharing Your Public URL
Never share your dashboard’s public URL on forums, social media, or support tickets without redacting it. Automated bots scan these platforms for exposed services.
Mistake 7: Skipping Two-Factor Authentication
Enable 2FA on your dashboard. Even if someone obtains your password, they cannot access your system without the second factor.
FAQ: Smart Home Dashboard External Access Issues
Why does my smart home dashboard work on Wi-Fi but not on cellular data?
When you are on your home Wi-Fi, your device accesses the dashboard through the local network. On cellular data, the request must travel through the internet, which requires proper port forwarding, DNS configuration, and SSL setup. If any of these are missing or misconfigured, the dashboard will not load.
Is it safe to use port forwarding for my smart home dashboard?
Port forwarding can be safe if done correctly with strong authentication, HTTPS encryption, and regular software updates. However, it directly exposes your server to the internet. Safer alternatives include VPN solutions like Tailscale or WireGuard, or tunnel services like Cloudflare Tunnel.
What is the easiest way to access my smart home dashboard remotely?
For Home Assistant users, Nabu Casa is the easiest option. For other platforms, Tailscale is extremely simple to set up and provides secure access without any port forwarding or DNS configuration.
Why does my dashboard load slowly when accessed externally?
Slow external access can be caused by limited upload bandwidth on your home internet, VPN overhead, large dashboard pages loading high-resolution camera feeds, or your server being underpowered. Consider optimizing your dashboard by reducing the number of camera streams and compressing images.
Can I access my smart home dashboard from another country?
Yes, all the solutions discussed in this article work internationally. However, be aware that some countries block VPN connections. Cloudflare Tunnel and cloud relay services like Nabu Casa are more likely to work in restrictive network environments.
What is CGNAT and how does it affect my smart home?
Carrier-Grade NAT (CGNAT) is a technique used by ISPs where multiple customers share a single public IP address. This makes traditional port forwarding impossible. Solutions include Cloudflare Tunnel, Tailscale, ZeroTier, or requesting a dedicated public IP from your ISP.
How do I know if my SSL certificate has expired?
You can check your SSL certificate status by visiting your dashboard URL in a browser and clicking on the padlock icon in the address bar. Online tools like SSL Labs provide detailed certificate analysis.
Why does my Home Assistant companion app say “Unable to connect”?
This usually means the app cannot reach your Home Assistant server. Check that your external URL is correctly configured in the Home Assistant settings, your SSL certificate is valid, and your remote access method (VPN, tunnel, or port forwarding) is functioning properly.
Final Thoughts
Smart home dashboard failures during external access are frustrating, but they are almost always solvable. The key is understanding the chain of connections between your phone and your home server, and systematically checking each link in that chain.
If I could give you just one piece of advice based on years of experience, it would be this: do not overcomplicate things. Many users start with port forwarding, add a reverse proxy, configure dynamic DNS, and manage SSL certificates manually. Each additional component is another potential point of failure.
Instead, consider using a modern tunnel-based solution like Cloudflare Tunnel or Tailscale. These tools eliminate most of the complexity by establishing outbound connections from your server. No port forwarding needed. No DNS headaches. No CGNAT limitations.
Whatever method you choose, never compromise on security. Your smart home controls physical devices in your living space. A security breach is not just a data problem. It is a safety concern.
Take the time to set things up correctly, test thoroughly, and keep everything updated. Your future self, sitting in a coffee shop and effortlessly adjusting your home thermostat, will thank you.