
Table of Contents
- Introduction: A Frustrating Discovery
- What Is DNS and Why Does It Matter for Smart Homes?
- How DNS Works Behind the Scenes in Smart Home Devices
- Why Switching DNS Providers Breaks Smart Home Integrations
- Real Devices That Commonly Break After a DNS Change
- Real User Experiences: When DNS Changes Went Wrong
- Step by Step Guide to Switch DNS Without Breaking Your Smart Home
- How to Diagnose DNS Related Smart Home Issues
- Safe DNS Providers That Work Well With Smart Homes
- Advanced Fixes: Per Device DNS Rules Using Your Router
- Common Mistakes to Avoid When Changing DNS
- FAQ: Frequently Asked Questions
- Final Thoughts
Introduction: A Frustrating Discovery
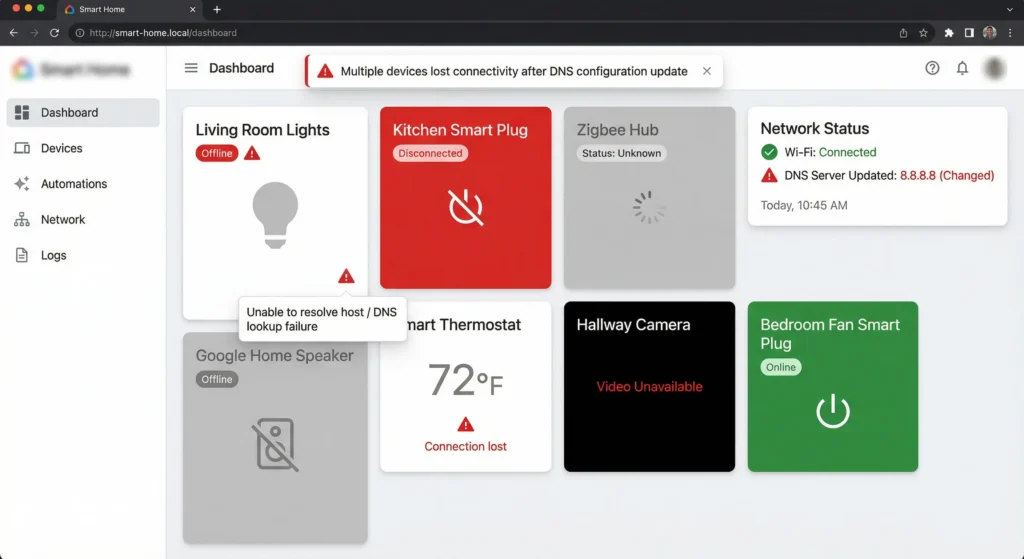
Last month, a friend of mine decided to switch his home network DNS from his ISP default to Cloudflare (1.1.1.1) for faster browsing. Within minutes, his Google Nest speakers stopped responding to voice commands, his Philips Hue lights disappeared from the app, and his Ring doorbell went completely offline.
He called me in a panic, thinking his devices were broken. But the real culprit was something most people never think about: switching DNS providers break smart home.
If you have ever changed your DNS settings and suddenly found your smart home falling apart, you are not alone. This is one of the most common yet least discussed problems in modern smart home setups. In this guide, I will explain exactly why this happens, which devices are most vulnerable, and how you can switch DNS providers safely without losing control of your connected home.
This is not just theory. Everything here comes from real troubleshooting sessions, community reports, and hands on testing.
What Is DNS and Why Does It Matter for Smart Homes?
Understanding DNS in Simple Terms
DNS stands for Domain Name System. Think of it as the phonebook of the internet. When you type “google.com” into your browser, DNS translates that human readable name into an IP address like 142.250.80.46 so your device can actually connect.
Every single internet connected device in your home relies on DNS to function. Your phone, laptop, smart TV, thermostat, security camera, and voice assistant all need DNS to communicate with their cloud servers.
Why Smart Home Devices Depend Heavily on DNS
Unlike your laptop or phone, smart home devices are designed to communicate with very specific servers. A Google Nest Hub needs to reach Google’s servers. An Amazon Echo needs to connect to AWS endpoints. A Ring doorbell must communicate with Ring’s cloud infrastructure.
When DNS works properly, these connections happen invisibly in the background. But when you change your DNS provider, several things can go wrong that disrupt these carefully designed communication paths.
How DNS Works Behind the Scenes in Smart Home Devices
The Hidden DNS Requests Your Devices Make
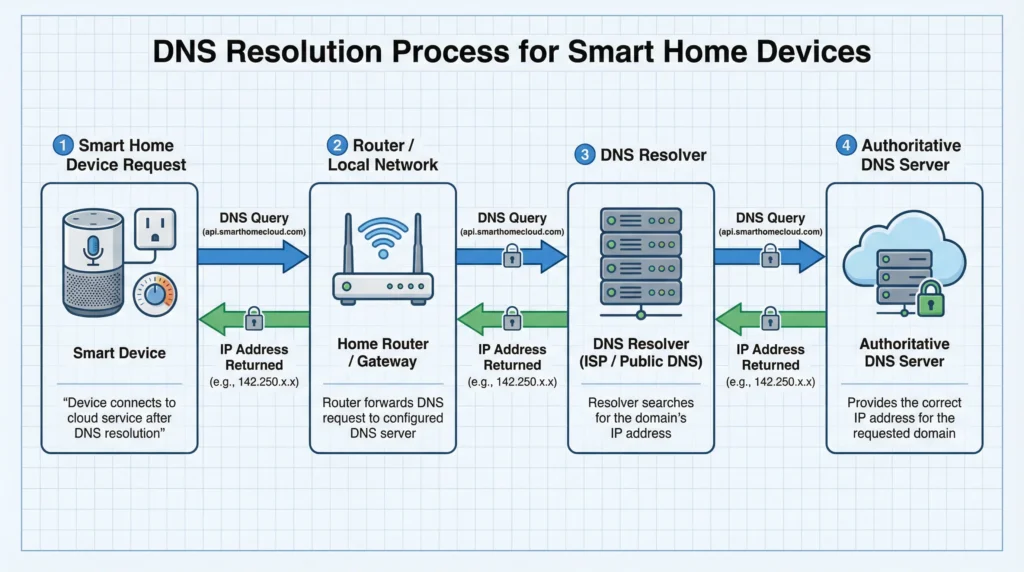
Most people do not realize how many DNS requests their smart home devices make every day. A single Amazon Echo can make hundreds of DNS queries per hour, reaching out to various Amazon services, content delivery networks, and third party skill servers.
Here is what typically happens when you press a button on your smart light app:
- Your phone sends a request to the smart light cloud server
- DNS resolves the server domain name to an IP address
- The command reaches the cloud server
- The cloud server sends the command to your light
- Your light receives the instruction and turns on or off
If step 2 fails because your new DNS provider cannot resolve the domain correctly, the entire chain breaks.
Hardcoded DNS vs. Network DNS
This is where things get tricky. Some smart home devices respect whatever DNS server your router assigns them. Others have DNS servers hardcoded into their firmware. Google devices, for example, are well known for hardcoding 8.8.8.8 and 8.8.4.4 as their DNS servers, regardless of what you set on your router.
When your router level DNS and a device’s hardcoded DNS conflict, strange things happen. Devices may partially work, respond slowly, or fail to connect entirely.
Why Switching DNS Providers Breaks Smart Home Integrations
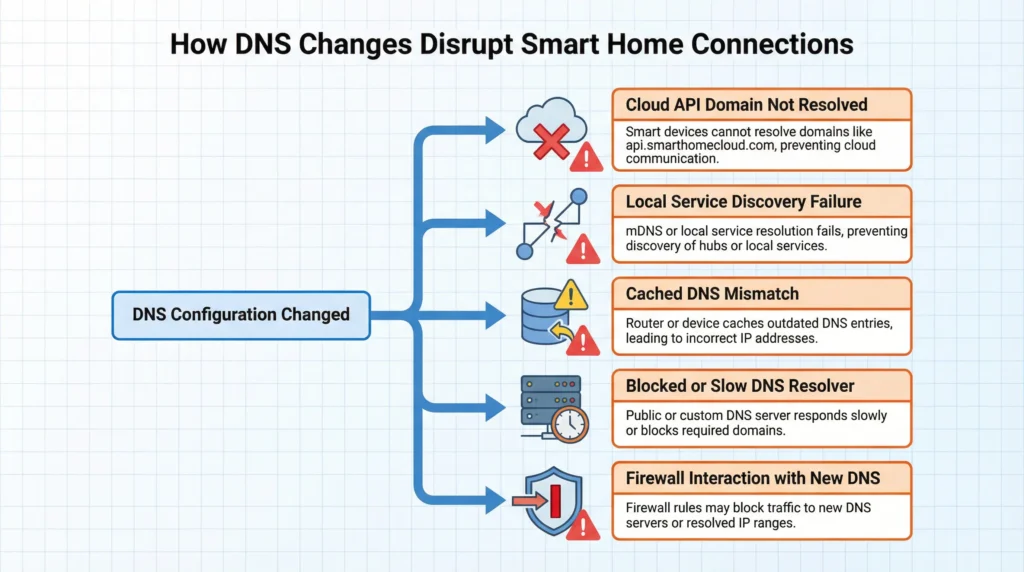
Now let us get into the core of the problem. There are several specific technical reasons why changing your DNS provider can break your smart home.
1. DNS Rebinding Protection
Many security focused DNS providers like Pi-hole, NextDNS, and even some configurations of Cloudflare implement DNS rebinding protection. This security feature blocks DNS responses that point to private IP addresses (like 192.168.x.x).
Here is the problem: many smart home devices use a technique called DNS rebinding for local communication. When your phone and your smart light are on the same network, the cloud server may return your light’s local IP address so commands travel faster. If your DNS provider blocks this response, your phone cannot find the device locally, causing timeouts, delays, or complete failure.
2. Blocking of Device Specific Domains
If you switch to a DNS provider with built in ad blocking or privacy filtering, such as AdGuard DNS or Pi-hole, certain domains that your smart home devices need may get blocked.
For example:
- Amazon Echo devices need access to
pindorama.amazon.comand severalamazonalexa.comsubdomains - Google Home devices require
clients3.google.comandconnectivitycheck.gstatic.com - Smart TVs often need
samsungcloudsolution.netorlgtvsdp.com
If your new DNS provider blocks any of these as “trackers” or “telemetry,” your devices stop functioning.
3. Geographic DNS Resolution Differences
Your ISP DNS server typically resolves domains to the closest geographic server. When you switch to a global DNS provider, the resolved IP addresses may point to servers in a different region.
For smart home devices, this can cause:
- Increased latency that triggers timeout errors
- Connection to a regional server that does not have your account data
- Failed authentication because the regional server does not recognize your device
4. DNSSEC Validation Failures
Some DNS providers enforce strict DNSSEC (DNS Security Extensions) validation. While this is great for security, some smart home device manufacturers have not properly configured DNSSEC for their domains. When your new DNS provider tries to validate these domains and fails, it refuses to resolve them entirely.
5. Split DNS and mDNS Conflicts
Smart home ecosystems like Apple HomeKit and Google Home rely on mDNS (Multicast DNS) for local device discovery. When you change your primary DNS, some routers reconfigure their mDNS relay behavior, which can prevent devices from discovering each other on the local network.
This is especially common with:
- Matter protocol devices
- HomeKit accessories
- Chromecast and Google Cast devices
Real Devices That Commonly Break After a DNS Change
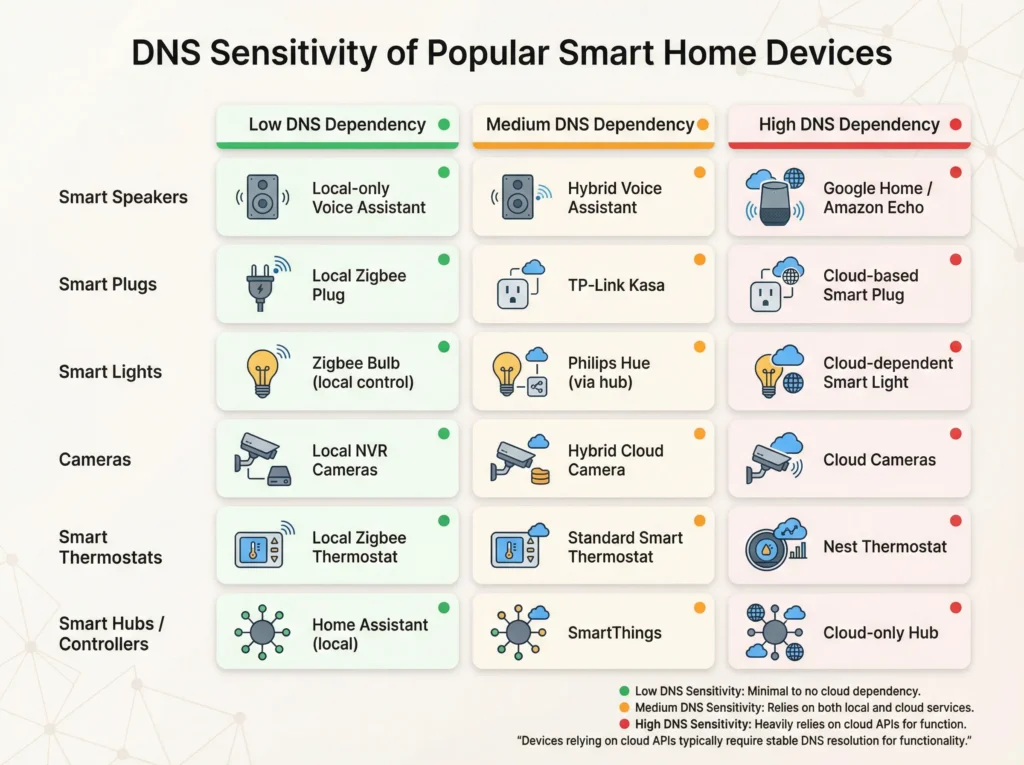
Google Nest and Chromecast Devices
Google devices are among the most problematic after a DNS change. They hardcode Google’s own DNS servers (8.8.8.8), and if your router or firewall intercepts and redirects DNS traffic, Google devices may enter a loop where they cannot authenticate with Google’s servers.
Common symptoms include:
- “Something went wrong” errors on Google Home app
- Chromecast unable to cast from any device
- Google Nest Hub showing a blank or error screen
- Voice commands failing with “I can’t reach [device name] right now”
Amazon Echo and Alexa Devices
Alexa devices are slightly more flexible with DNS, but they communicate with dozens of Amazon subdomains. Switching to a filtering DNS can block critical endpoints, causing:
- Skills failing to load
- Smart home device discovery not finding new devices
- Routines stopping mid execution
- Music streaming cutting out randomly
Philips Hue Bridge
The Hue Bridge uses cloud services for remote access and third party integrations. A DNS change can break:
- Remote control through the Hue app when away from home
- IFTTT integrations
- Voice assistant connections
- Hue Sync functionality
Ring and Blink Cameras
Security cameras are particularly sensitive because they maintain persistent connections. After a DNS change:
- Live view may fail to load
- Motion alerts may stop arriving
- Recorded clips may not upload to the cloud
- Two way audio may become one directional or stop entirely
Apple HomeKit Devices
While HomeKit primarily uses local communication, the Home Hub (Apple TV or HomePod) needs DNS to sync with iCloud. Breaking this sync means:
- Automations stop running
- Remote access fails
- Device status does not update
- Shared home members lose access
Real User Experiences: When DNS Changes Went Wrong
Experience 1: The Pi-hole Disaster
A Reddit user shared this experience on r/smarthome:
“I set up Pi-hole on a Raspberry Pi thinking I would block ads and speed up my network. Within an hour, my wife was yelling from the kitchen that Alexa would not turn off the lights, the Nest thermostat app was showing offline, and our Sonos speakers stopped playing music. It took me three days to figure out which domains to whitelist before everything worked again.”
This is incredibly common. Pi-hole blocks thousands of domains by default, and many of those domains are essential for smart home functionality.
Experience 2: The Cloudflare Family Filter Problem
Another user on the Home Assistant community forum reported:
“I switched to Cloudflare 1.1.1.3 (the family filter version) to protect my kids. Everything on the computer worked fine, but my Tuya smart plugs went completely offline, and my Eufy cameras stopped sending notifications. The family filter was blocking some of the Chinese cloud servers that Tuya devices rely on.”
Experience 3: The Corporate DNS at Home
A network engineer shared his story:
“I work in IT and I brought home a corporate mentality. I set up Quad9 with strict DNSSEC enforcement and blocked all outgoing DNS except through Quad9. My entire Google Home ecosystem collapsed. Turns out, Google devices insist on using 8.8.8.8, and when I blocked that, they essentially bricked themselves until I created a firewall exception.”
Step by Step Guide to Switch DNS Without Breaking Your Smart Home
If you want to change your DNS provider safely, follow these steps carefully.
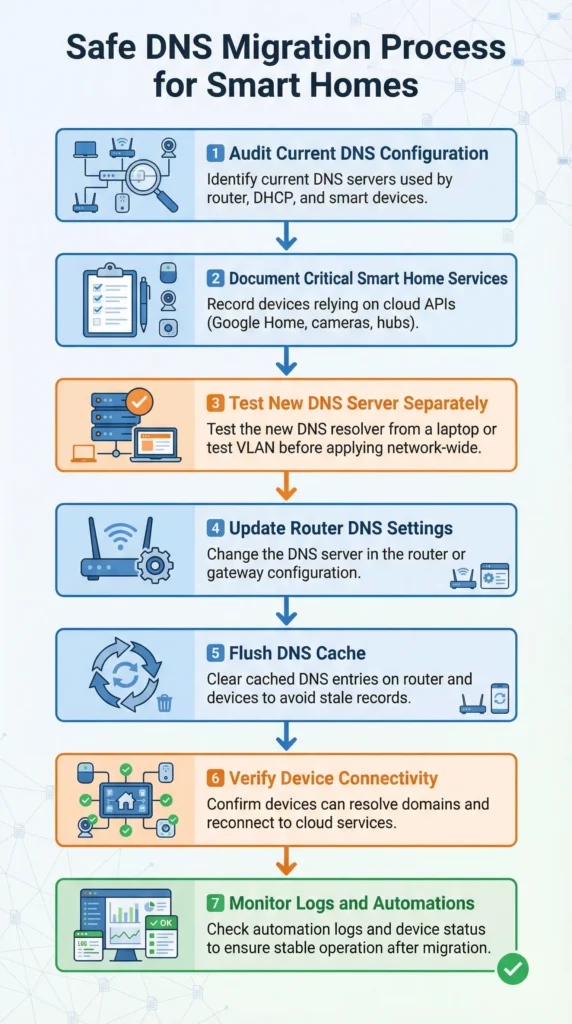
Step 1: Document Your Current Setup
Before changing anything, write down:
- Your current DNS server addresses (found in your router settings)
- A list of all smart home devices on your network
- Which integrations each device uses (voice assistants, IFTTT, automations)
- Your router model and firmware version
Step 2: Test the New DNS on a Single Device First
Do not change DNS at the router level immediately. Instead:
- Pick one phone or computer
- Manually set its DNS to the new provider
- Test controlling every smart home device from that single device
- Monitor for 24 to 48 hours before proceeding
Step 3: Check the New DNS Provider’s Filtering Policies
Visit your new DNS provider’s website and review:
- Do they block any categories of domains by default?
- Do they enforce DNS rebinding protection?
- Do they support DNSSEC, and is it mandatory?
- Do they offer a whitelist or exception system?
Step 4: Create a Whitelist Before Switching
Compile a whitelist of domains your smart home devices need. Here are some essentials:
For Google devices:
clients3.google.comconnectivitycheck.gstatic.comaccounts.google.comgoogleapis.com
For Amazon Alexa:
pindorama.amazon.comalexa.amazon.comavs-alexa-*.amazon.comdevice-metrics-us.amazon.com
For Apple HomeKit:
*.icloud.com*.apple.comguzzoni.apple.com
For Tuya based devices (most cheap smart plugs and bulbs):
*.tuyaus.com*.tuyaeu.com*.tuyacn.com
Step 5: Change DNS at the Router Level
Once you have tested successfully:
- Log into your router admin panel
- Navigate to WAN or Internet settings
- Change the primary and secondary DNS servers
- Save and reboot the router
- Reboot all smart home hubs and bridges
Step 6: Monitor for 48 Hours
After the switch:
- Test every smart home device manually
- Run all automations and routines
- Check remote access from outside your home
- Verify that voice commands work on all assistants
- Test security camera live feeds and notifications
Step 7: Set Up DNS Exceptions for Stubborn Devices
If certain devices still fail, you may need to:
- Create static DHCP entries with different DNS for specific devices
- Set up DNS forwarding rules on your router
- Allow hardcoded DNS traffic (like Google’s 8.8.8.8) through your firewall
How to Diagnose DNS Related Smart Home Issues
Quick Diagnostic Checklist
If your smart home devices stopped working after a DNS change, follow this diagnostic flow:
Test 1: Can the device reach the internet at all?
Check if the device’s LED indicators show a connection. Most devices have a specific color or pattern for “no internet.”
Test 2: Can you ping the device’s cloud server?
Open a terminal on your computer and try:
textnslookup alexa.amazon.com
nslookup clients3.google.com
If these return errors, your DNS is not resolving critical domains.
Test 3: Compare results with a known working DNS
Try the same queries using Google DNS directly:
textnslookup alexa.amazon.com 8.8.8.8
If this works but your new DNS does not, you have found the problem.
Test 4: Check DNS query logs
If you are using Pi-hole, AdGuard Home, or NextDNS, check the query log for blocked domains. Look for red or denied entries from your smart home device IP addresses.
Using Router Logs to Identify the Problem
Most modern routers keep a DNS query log. Access your router admin panel and look for:
- Failed DNS queries from smart home device IPs
- Unusual numbers of retry attempts from specific devices
- DNS timeout errors
Safe DNS Providers That Work Well With Smart Homes
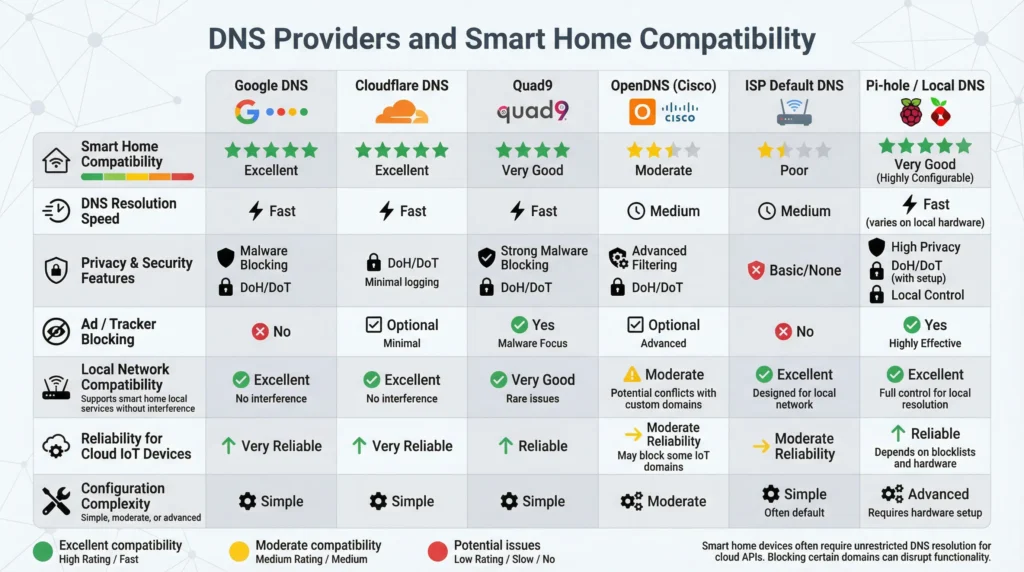
Not all DNS providers cause problems. Here is a comparison based on real world smart home compatibility testing:
| DNS Provider | IP Address | Smart Home Compatible | Filtering | DNS Rebinding | Notes |
|---|---|---|---|---|---|
| Google Public DNS | 8.8.8.8 | Excellent | None | No protection | Best for Google devices |
| Cloudflare | 1.1.1.1 | Very Good | None (standard) | Minimal | Fast and reliable |
| Cloudflare Family | 1.1.1.3 | Moderate | Malware + Adult | Yes | May block some IoT servers |
| Quad9 | 9.9.9.9 | Good | Malware only | Yes | Strict DNSSEC can cause issues |
| NextDNS | Custom | Good (with config) | Customizable | Configurable | Best for advanced users |
| AdGuard DNS | 94.140.14.14 | Moderate | Ads + Trackers | Yes | Needs whitelisting for IoT |
| OpenDNS | 208.67.222.222 | Good | Customizable | Minimal | Family shield may block IoT |
| Pi-hole (self hosted) | Custom | Requires setup | Fully customizable | Configurable | Most control but most work |
My Recommendation
For most smart home users, I recommend using Google Public DNS (8.8.8.8) or Cloudflare standard (1.1.1.1) as your primary DNS. These provide fast resolution without filtering that could break your devices.
If you want filtering for ad blocking or parental controls, use NextDNS with a custom configuration. NextDNS lets you create device specific profiles and whitelist domains easily, making it the best balance between security and smart home compatibility.
Advanced Fixes: Per Device DNS Rules Using Your Router
The Best Solution: Split DNS Configuration
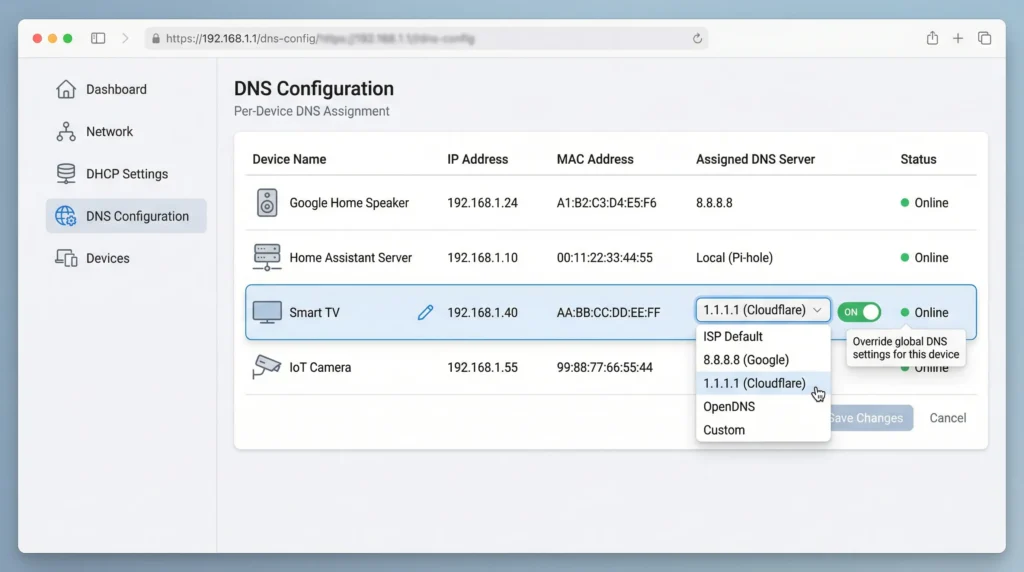
The smartest approach is to assign different DNS servers to different devices on your network. This way, your computers and phones can use a filtering DNS while your smart home devices use an unfiltered DNS.
How to Set This Up on Popular Routers
On ASUS Routers (with Merlin firmware):
- Go to LAN > DHCP Server
- Under “DNS Server,” set your preferred filtering DNS
- Go to LAN > Manual Assignment
- Add each smart home device with a static IP
- Use the DNSFilter feature to assign Google DNS (8.8.8.8) to those specific IPs
On UniFi/Ubiquiti Routers:
- Create a separate VLAN for IoT devices
- Assign a different DNS server to the IoT VLAN
- Set up firewall rules to allow IoT DNS traffic
- Place all smart home devices on the IoT VLAN
On pfSense/OPNsense:
- Create a DHCP scope for smart home devices
- Assign a different DNS forwarder to that scope
- Use NAT rules to redirect hardcoded DNS (like 8.8.8.8) if needed
- Configure firewall rules to allow the designated DNS traffic
Handling Devices With Hardcoded DNS
For devices like Google Home that insist on using 8.8.8.8, you have two choices:
Option A: Allow it. Simply let the device use its hardcoded DNS. This is the easiest and most reliable approach.
Option B: Redirect it. Use a NAT rule on your router to intercept traffic going to 8.8.8.8 and redirect it to your preferred DNS. Be aware that this can cause issues with devices that verify they are actually talking to Google’s servers.
Common Mistakes to Avoid When Changing DNS
Mistake 1: Changing DNS and Forgetting About It
Many people change their DNS, notice nothing wrong immediately, and move on. Smart home issues often appear hours or days later when a device tries to renew its connection or when an automation runs on schedule. Always monitor for at least 48 hours.
Mistake 2: Not Flushing DNS Cache After Switching
After changing DNS at the router level, your devices may still use cached DNS entries. Reboot your router and all smart home hubs to clear the cache. On your computer, run:
- Windows:
ipconfig /flushdns - Mac:
sudo dscacheutil -flushcache - Linux:
sudo systemd-resolve --flush-caches
Mistake 3: Using Multiple Filtering DNS Providers
Some people set their primary DNS to Cloudflare Family and their secondary to AdGuard. This creates inconsistent filtering behavior where the same domain might be blocked by one provider and allowed by another, causing intermittent smart home failures that are extremely difficult to diagnose.
Mistake 4: Blocking All DNS Except Your Chosen Provider
While this seems like good security practice, it will break devices with hardcoded DNS servers. At minimum, you should allow traffic to 8.8.8.8 and 8.8.4.4 for Google devices and to Amazon’s DNS endpoints for Alexa devices.
Mistake 5: Assuming All Smart Home Devices Behave the Same
Different devices, even from the same manufacturer, may handle DNS differently. A Google Nest Mini might work fine while a Chromecast on the same network fails completely. Test each device individually.
FAQ: Frequently Asked Questions
Can changing DNS really brick my smart home devices?
Changing DNS will not permanently brick your devices, but it can make them completely non functional until you fix the DNS configuration. Your devices are fine physically. They just cannot reach their cloud servers. Reverting to your previous DNS settings will restore everything.
Which DNS is best for a smart home network?
Google Public DNS (8.8.8.8) and Cloudflare (1.1.1.1) without filtering are the most compatible options for smart home networks. They resolve quickly, do not block IoT domains, and are highly reliable. If you need filtering, NextDNS with custom whitelisting is the best choice.
Will Pi-hole break my smart home?
Pi-hole can break smart home devices if you use aggressive blocklists. However, Pi-hole is also the most configurable option. You can whitelist specific domains for your smart home devices. The Pi-hole community maintains lists of domains that should be whitelisted for popular smart home platforms.
Do smart home devices work without internet or DNS?
Some devices offer limited local control without internet. For example, Philips Hue lights can be controlled locally through the Hue Bridge, and Matter protocol devices are designed for local operation. However, voice assistants, cloud automations, remote access, and most integrations require working DNS and internet connectivity.
Why did only some of my devices break when I changed DNS?
Different devices depend on different cloud services. If your new DNS blocks Domain A but not Domain B, only the devices that need Domain A will break. Also, devices with hardcoded DNS servers may continue working because they bypass your router’s DNS settings entirely.
Can I use different DNS for my smart home and my computers?
Yes, and this is actually the recommended approach. You can use per device DNS assignment through your router’s DHCP settings, or create separate VLANs for smart home devices and regular devices, each with different DNS configurations.
How do I know which domains my smart home devices need?
The best method is to monitor DNS queries before making any changes. Tools like Pi-hole, NextDNS, or Wireshark can show you every domain each device on your network is trying to reach. Run this monitoring for at least a week to capture all periodic requests.
Does changing DNS affect Matter or Thread devices?
Matter and Thread are designed to work primarily over local networks, reducing DNS dependency. However, the initial setup, cloud linking, and remote access features of Matter devices still require DNS. Thread border routers also need DNS for firmware updates and cloud synchronization.
Helpful External Resources
For further reading and troubleshooting, check these resources:
- Pi-hole Commonly Whitelisted Domains – Community maintained whitelist for smart home compatibility
- Cloudflare DNS Documentation – Official setup guides and troubleshooting
- Google Nest WiFi and DNS Support – Google’s official guidance on DNS settings for Nest devices
- NextDNS Smart Home Configuration Guide – How to configure NextDNS for IoT devices
- Home Assistant DNS Troubleshooting – DNS configuration for Home Assistant users
Final Thoughts
Switching DNS providers is one of those changes that seems simple on the surface but can create chaos in a connected home. The good news is that once you understand why it happens, preventing it is straightforward.
The key takeaway is this: your smart home devices are not as flexible as your computer or phone when it comes to DNS. They need specific domains to be resolvable, they sometimes hardcode their own DNS servers, and they do not handle DNS failures gracefully.
Before you make any DNS changes, take the time to plan. Document your devices, test on a single device first, prepare your whitelists, and monitor closely after the switch. If you follow the steps in this guide, you can enjoy the benefits of a better DNS provider without sacrificing your smart home functionality.
Your smart home should make your life easier, not harder. A little preparation goes a long way in keeping everything connected and running smoothly.